Category Archives: Gardening

DEALING WITH CURLY LEAF DISEASE IN STONE FRUIT (Wally Richards)

All too often I am asked questions about problems that have already occurred and its to late to prevent them. Its like the old saying, closing the gate after the horse has gone.

Unless you are onto it, you will miss the vital times when your efforts will be worthwhile and make a difference for that season.

We are now into July; the middle of winter and if patterns follow the past few seasons we are likely to see some good weather in August which will mean, (with the extending day light hours) things will start moving.

The following are situations for gardeners that have these problems from the past. Here is what I believe to be the best ways to handle them.

If you read my recent articles about making the soil healthy then apply that also to the following problems because healthy soil will make for healthy plants given time and in most cases.

Plants and trees etc that do not healthy and have a weak constitution, likely through breeding, should after a few seasons of effort be disposed of and replaced with another specimen that can be healthy.

Curly leaf is a disease on stone fruit trees which effects nectarines and peaches.

The spores from the previous season are sitting waiting for the leaves to form and the right conditions to infect. The damage from last spring will lead to even more damage this spring unless you intervene.

If the damage is severe enough, not only will you not have any crop but you can also lose the tree.

I have had a few interesting talks with gardeners that have grown stone fruit directly from stones.

These trees grow on their own root stock, fruit within a couple of years or so and do not have curly leaf disease.

This means that it is the grafted varieties of stone fruit that we have problems with and the very worst ones are those dwarf specimens for curly leaf.

So what to do:

The trees and the ground under them should be sprayed with potassium permanganate at half a teaspoon per litre of water now. Add about a level tablespoon of Ocean Solids to the spray as it increases the effectiveness.

Leave for about two weeks and spray again with potassium permanganate at ¾ a teaspoon into a litre of water with 3 tablespoons of Ocean Solids, dissolved and then added to a further 10 litres of water.

Spray the whole tree and drench the soil underneath from trunk to beyond the drip line.

What we are trying to do here is kill as many spores of the disease as possible that are on the tree and in the soil under the tree.

Some years ago I suggested scattering Ocean Solids under the trees before they start to move in the spring, the information on this came from Sea90 for those familiar with that method.

I have heard some positive feed back from gardeners that have done this and they also said that if any damage starts to appear on the foliage they spread some more Ocean Solids.

Likely the sodium chloride neutralizes the spores as well as increasing the mineral uptake of the tree.

The traditional method of control is to spray the tree, once the leaves start to appear, this is done every 7 to 10 days with Wallys Liquid Copper and Raingard.

The idea here is to keep a film of copper over the leaves as they are growing to kill the spores when they land on the leaves.

‘This spray program is repeated for about 2 months. The Raingard is very important because without it the copper would wash off in rain and that is when the disease spores strike.

I have also suggested the use of Vaporgard to be sprayed over and under the foliage once a good amount of leaves have appeared without damage.

The film is also a barrier to the spores and will assist the tree to produce more energy from sunlight helping to retain a good crop of fruit.

Growing your own fruit and vegetables naturally is the answer to better health.

Codlin moth another annoying pest that spoils apples, walnuts and sometimes pears.

At this time the codlin are in cocoons, pupating waiting for the right time to emerge to mate, lay their eggs and damage your apples.

Where they are hiding is in nooks and crannies on the tree, but mainly in the soil under the tree.

What you could do at this time if you had a few chickens is netting off the area under the tree, rake the soil and put your hens in there to gobble up any cocoons they scratch out.

Next at end of July sprinkle Wally Neem Tree Granules under the tree from trunk to drip line.

What this does is create a smell from the granules breaking down that prevents the moths when they emerge to detect the apple tree above them.

They sit there waiting for the tree to come along and hopefully will be eaten by birds.

The pests are not going to emerge till the apples have set on the tree after flowering and the weather conditions are congenial.

Once the flowering has finished you can put a can with treacle in an onion bag and hang it in the tree.

This will attract the male moths, by monitoring the trap you will know when they are on the wing.

Then you can start spraying with Wallys Neem Tree Oil and Raingard every 10 to 14 days.

You dont need to spray the tree just the apples so they have a coating of oil on them when the grubs take their first bite. Once activity stops in your trap you can stop spraying.

Another alternative I discovered last season was to use crop cover wrapped around the fruiting branches and pegged with clothes pegs.

It can be taped on at the beginning of a branch, one layer only which allows sufficient light to leaves and fruit and I found not only did it keep birds from pecking the fruit it also prevented any codlin moth damage.

Psyllids on potatoes, tomatoes, tamarillos and some other plants.

A real problem pest which ideally with potatoes you plant the seed potatoes as soon as possible, protect them from frost by mounding up over foliage then once this has become impractical then use crop cover over hoops to give frost protection.

Harvest the crop about Labour Weekend or as soon as mature.

In early and out as soon as mature is easy solution. If you want a late planting use the special Quarantine cloth over the crop to prevent the psyllids getting in.

Otherwise use the cell strengthening kit which toughens the foliage so that the nymphs cannot feed.

Tomato plants are ruined by the psyllids much to the dismay of gardeners.

The idea is; to strengthen the plant’s cells so that the weak piercing-sucking mouth parts of the psyllids have difficulties piercing the strong cells of the plant and therefore cant feed and die.

REMINDER  EARLY BIRD SPRING PROMOTION COMING TO AN END

For our Early Bird Promotion till the end of July (July 31st cut off) the following applies. Neem Powder Neem Granules all sizes, 1kg, 3kg 10 kg and 20 kg 20% off the mail order web site price.

All other gardening products 15% off the marked prices but excluding bulk items such as 12.5 kilos Fruit & Flower etc.

Shipping if after discounts and excluding bulk items the order is $150 plus North Island or $200 plus South Island Free shipping for those orders.

Under those order sizes shipping at cost to you.

Often the discounts given means that you can get free shipping as the discount covers the shipping costs.

Orders must be placed on line at www.0800466464.co.nz

You cant pay on the web site and we phone you after receiving the order to give you your discounts.

Please put in the remarks place ‘Early Bird’ so I know to sort out the discounts before I phone you.

We can then take credit card details over the phone safely or email you details to do a bank transfer.

Regards

Wally Richards

Phone 0800 466464

Problems ring me at 0800 466464
Email wallyjr@gardenews.co.nz
Web site www.gardenews.co.nz

Phone 0800 466464
Garden Pages and News at www.gardenews.co.nz
Shar Pei pages at  www.sharpei.co.nz
Mail Order products at www.0800466464.co.nz

Photo: pixabay.com

Growing potatoes (Wally Richards)

Once upon a time when the world was a much better place and people could afford to buy a quarter acre of land and build a house for their family to grow up in and enjoy the benefits of those days 50 to 100 years ago.

(You only have to think back to see how bad things have become in more recent years. )

Well the first thing that a young married man would do with the land would be to plant a crop of potatoes.

This served two purposes it would help break up the earth for future gardens and lawns plus a bounty crop of potatoes to store and use.

Nowadays because of the dread potato psyllid you need to plan and plantings of potatoes and later on tomatoes or use controls to combat the psyllid.

If you had psyllids last season and did not use the Cell Strengthening products you will have worse problems this season.

With potatoes there is a way to get a early crop in and out before the plants are attacked.

Psyllids are temperature controlled and when too hot like over 35 degrees or too cool like under 15 degrees they are slow to reproduce.

When the temperatures are ideal for them they produce in the hundreds and thousands.

When they feed on the foliage they inject a toxin into the potato plants which will prevent the baby tubers from growing bigger than a marble,

or if the tubers have reached a reasonable size then you find in the harvested potatoes dark rings and they taste bad.

Early planting is a way around the problem and the way to do this is:

Dig a trench about one and a half spade depth.

Place your sprouted potato on top of the following at the base of the trench,  about a table spoon of gypsum, quarter a teaspoon of BioPhos a few sheep manure pellets and a sprinkling of Wally Neem Tree Powder.

Sprouts should facing skywards. Use  a little soil to cover the sprouts.

The soil protects against any frosts and possible early emergence of psyllids. 

Now this is most important you need to check frequently the crop and as soon as the new sprouts pop though the cover add a little more soil to re-cover.

You keep doing this till until your trench is filled level with the soil.

Then you start mounding up to keep the sprouts covered.Not only will this be adequate protection from late frosts but will increase the size of your crop.

The new potatoes will form all the way up the haulm of the potatoes you planted as long as you covered the sprouts as they appear.

If you don’t then once the spouts get up a few inches out of the ground you will not obtain any extra potatoes to harvest.

Growing quick maturing potatoes now should have them mature and ready to harvest before the temperatures rise and the psyllids come out to play.

When you stop mounding sprinkle Wallys Neem Tree Powder as a side dressing each side of the row.

When the crop is mature than either lift so the tubers are safe or if you leave them in the ground removed the top foliage and cover the stubble with soil so there is nothing for the psyllids to attack.

Ideally the above could have been done in the middle of winter like in May/June.

The earlier the better.

Any late crop of potatoes planted say about Labour Weekend will likely be doomed to failure once the tops are exposed and before maturity.

To overcome this possibility then you Need to use Wallys Cell Strengthening kit to make the cells of the plants so tough that the nymphs can not piece to feed.

This means about the time of planting the seed potatoes and started covering then a soil drench of Wallys Silicon and Boron soil drench.A send drench can be applied about the time you stop mounding.

Then a weekly spray of the foliage with Wallys Silicon Cell Strengthening Spray with Wallys Super Spreader added which drives the spray into the plants.

Use those products and your should be able to have later crops with no psyllid damage.The same products should be used for your tomatoes, capsicums, chili, garlic and tamarillos. 

I also like to add Magic Botanic Liquid to the cell strengthening spray for greater results.

REMINDER  EARLY BIRD SPRING PROMOTION

For our Early Bird Promotion till the end of July (July 31st cut off) the following applies.Neem Powder Neem Granules all sizes, 1kg, 3kg 10 kg and 20 kg 20% off the mail order web site price.

All other gardening products 15% off the marked prices but excluding bulk items such as 12.5 kilos Fruit & Flower etc.

Shipping if after discounts and excluding bulk items the order is $150 plus North Island or $200 plus South Island Free shipping for those orders.

Under those order sizes shipping at cost to you.

Often the discounts given means that you can get free shipping as the discount covers the shipping costs.

Orders must be placed on line at http://www.0800466464.co.nz

You cant pay on the web site and we phone you after receiving the order to give you your discounts.

Please put in the remarks place ‘Early Bird’ so I know to sort out the discounts before I phone you.

We can then take credit card details over the phone safely or email you details to do a bank transfer.

Regards

Wally Richards
Phone 0800 466464
Garden Pages and News at www.gardenews.co.nz
Shar Pei pages at  www.sharpei.co.nz
Mail Order products at www.0800466464.co.nz

Photo: pixabay.com

Deterring cats from your garden (Wally Richards)

A deterrent is a thing that discourages or is intended to discourage someone or something from doing something.

The word ‘Deterrent’ is not a word that is used much in gardening but it is a means to prevent something that you do not want to happen from actually happening.

For instance; you don’t want cats from digging up seedlings or having their toilets in your gardens.

Many years ago when I was wearing a younger man’s shoes I learnt that cats do not like the smell of naphthalene which was told to me by a older gardener.

Having at the time a garden shop I thought that it would be a good product to sell as many gardeners complained about cats using their gardens as toilets.

Most of the time it was not their cat but cats from around the neighborhood.

I found a company in NZ that imported tons of naphthalene for the tanning industry so it was easy to obtain a 25 kilo bag of the crystals and make it available for gardeners to use.

Back then moth balls were also available and most types of moth balls were naphthalene in a ball shape.

Time past and the tanning industry changed their methods of tanning hides and so my NZ supplier stopped importing naphthalene.

I soon found an Australian company that was importing naphthalene from Belgium.

This meant bringing a pellet every year across the ditch to met the demand.

Over the many years I have found that naphthalene is about 90% effective as a cat deterrent, with only the occasional cat not being affected. (Likely sinus problems)

Then one day a coup[le of years ago there was a news item that some children were putting moth balls (naphthalene) into their mouths thinking any thing round must be a lolly.

This cause quite a commotion and the Govt stepped in and banned the sale of moth balls along with naphthalene.

Not only was it not good to have young children eating mothballs but as the name applies Moth Balls are used as a insecticide against moth damage.

Now any insecticide has to be registered with the Govt and no one had ever done so as it is a very old means of protecting Grannies woollies in storage from moth damage.

So two reasons to ban naphthalene in form of balls or discs.

I was notified by one of my retail outlets that moth balls/ naphthalene were banned.

So I contacted EPA and had a wee chat with them about my product naphthalene flakes sold as Cat Repellent.

Firstly they said they were not aware of my product and as cats are not insects it put a different lighton the situation.

They said they would need to have a think about my Cat Repellent and get back to me.

Fortunately they came back within a few days saying that I could sell naphthalene crystals as Cat Repellent but I had to put it in a child proof container and use the label information that they required.

I told them that I was happy with that and so we found a child proof container that would hold 400 grams of naphthalene tampered down.

So gardeners all over NZ were able to deter cats and not have digested cat food in their gardens.

Next my Australian supplier informed me that because of regulations in Australia and a weak demand for naphthalene they were not importing any more.

I purchased 3 tons of what they had available which was enough to see me through a couple of years or so.

All good things come to an end and as I got down to my last couple 25 kilo bags I went looking for a new supply.

China was the first place as there is a lot of manufactured naphthalene there but being a Dangerous Goods (DG) they were only willing to sell a container load which would be about 10 to 20 tons. Enough to last me many years and a lot of money tied up in stock.

So next place to try was India and my Neem supplier in India found a several manufactures of which I could buy any amount that I required.

I purchased 250 kilos through my Indian contact and had him arrange to send it to NZ in my next container of Neem Granules and Powder.

Seems simple enough but not so as now days shipping lines do not want to come to NZ or Australia.

Why? Apparently it is too expensive now because our ‘without common sense’ Govt makes them sit off shore for weeks before they can come in and disembark their cargoes.

That means they are sitting on their thumbs using up fuel and having to pay the crew while on the beck and call of our authorities.

So no matter how hard we tried, no ship could be found to bring the naphthalene with our Neem Granules in our own container. (any excuse not to come to NZ

We were running out of Neem Granules and powder so we elected to bring the granules and leave the naphthalene behind.

My man in India found a German ship and our container was on the way minus our naphthalene.

Ok how to get 250kilos of a DG to New Zealand.

Aircraft were hungry for money so at a cost of just on $7000 we flew my 250 kilos in.

That made it a expensive product so a few changes had to be made.

Instead of 400 grams we reduced the amount to half, 200 grams and increased the price.

To offset the cost for gardeners I included instructions on how to get the most value and longer use out of the reduced amount.

Naphthalene if applied to a dry area will slowly evaporate over several weeks, months even, but if rained on or watered over its gone straight away.

So I have included instructions on how to take a common 2 litre plastic milk bottle and cut away part of the base to make a nice rain proof place to put a small amount of the naphthalene flakes in to deter cats.

You can simply use one or more of the milk containers to protect gardens, sheds, doors, porches etc from cat urine marking and toilet use.

Another New Normal.

Naphthalene can be used in other ways as a deterrent for other things which I can explain in a future article.

As usual …There are Bits about other things if you email me .

Problems ring me at 0800 466464
Email wallyjr@gardenews.co.nz
Web site www.gardenews.co.nz
Phone 0800 466464
Garden Pages and News at www.gardenews.co.nz
Shar Pei pages at  www.sharpei.co.nz
Mail Order products at www.0800466464.co.nz

ALL OF US CAN GROW FOOD IN CONTAINERS

The Seed Guy

It’s June 12th, and most Families have planted their Gardens by now. Some may have run into issues that are causing them to to plant late. Just to let you know, everyone can grow in containers, even if you live in an apartment or condo. You can also grow vegetables and herbs in containers indoors during the Winter, and have those fresh salads you always crave.

Please Plant a Garden. If you don’t have a big yard, or any yard at all, you can still plant in containers. I feel now more than ever that we will need to grow Home Gardens, and be able to help Feed our Families. We are in a very uncertain time in our Countries history, and we need to be prepared.

There are several types of containers that can be used for growing vegetables including polyethylene plastic bags, clay pots, plastic pots, metallic pots, milk jugs, ice cream containers, bushel baskets, barrels, and planter boxes. It is important to use containers that can accommodate roots of the vegetables you want to grow as the vegetables vary in sizes and rooting depths.

The container needs to have good drainage, and should not contain chemicals that are toxic to plants and human beings. Most vegetables grown in backyard gardens can be grown in containers, although a container’s diameter and depth needs to be considered when selecting what vegetables to grow. The plant density (number of vegetable plants per container) depends on individual plant space requirements, and rooting depth.

It’s best to use one of the potting mixes in vegetable container gardening as they are light, disease-free, weed seed-free, and have good drainage. Some potting mixes have pre-mixed plant nutrients, so read the information on the label about how long the pre-mix will feed your plants before you start applying fertilizers. You can also make your own two bushels of potting mix using the following recipe: Shredded sphagnum peat moss (1 bushel), Vermiculite (1 bushel), Ground limestone (1¼ cups), Phosphate fertilizer either 0-20-0 (½ cup) or 0-45-0 (¼ cup), Slow release granular fertilizer such as 5-10-5 (1 cup).

Container-grown plants require more frequent fertilization than field-grown plants because of the limited space within the container for drawing nutrients. Fertilizers can be mixed with the soil mix before filling the container and can also be applied as a nutrient solution. Nutrient solutions can be made by dissolving soluble fertilizer such as 10-20-10, 12-24-12 or 8-16-8 in water following label directions. The nutrient solution is applied once a day when the plants are watered. How often you water may vary with vegetables, but once a day is adequate.

Leach the unused fertilizer nutrients from the potting mix once a week by applying tap water only. It is also very important to water occasionally with a nutrient solution containing micro nutrients such as copper, zinc, boron, manganese, and iron and follow label directions in order to give plants the right amounts.

Plants grown in containers need frequent watering as the containers dry fast. Watering on a daily basis is necessary to provide adequate moisture for plant growth. Apply enough water to reach the bottom of the container. Allow the excess to drain out through drainage holes. Avoid wetting the leaves when watering as this will encourage development of foliar disease. Try not to allow the containers to dry out completely between watering as this will lead to flower and fruit drop. Do not over water the plants as the container will be waterlogged and the roots will lack oxygen leading to poor growth and eventually, perhaps, the plant’s death.

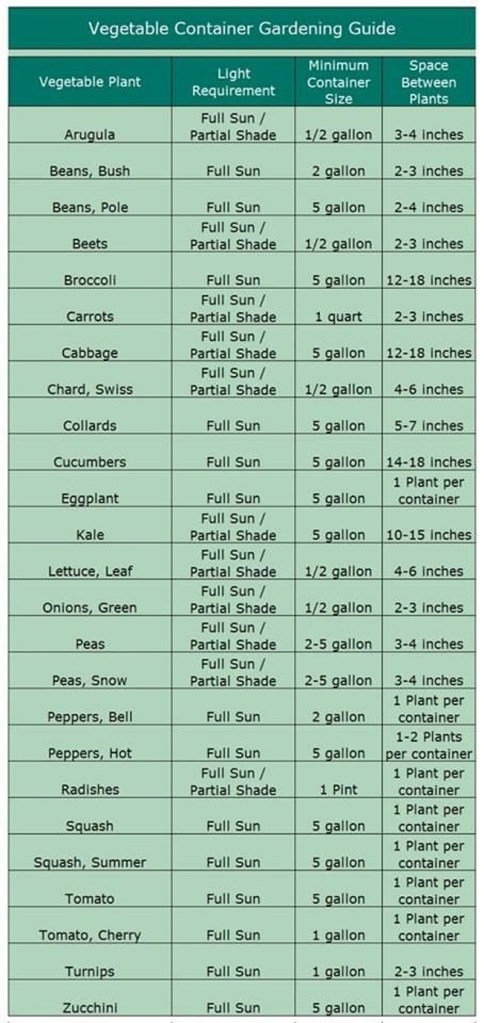
The size of the containers needed will depend a lot on the vegetable or herbs you are planting. Most Herbs can be planted in 1/2 – 1 gallon containers. Cabbages, Cucumbers, Green Beans, Leaf Lettuce, Spinach, Swiss Chard, and Cherry Tomatoes can be planted in 1 gallon containers. Beets, Carrots, Eggplants, Peppers and Radishes need 2 gallon containers. Your regular tomatoes will need 3 gallon containers. (great info from the University of Illinois Extension).

CONTAINER GARDENING GUIDE (The Seed Guy)

If you LIKE US on our Facebook page, you will be on our list for more great Gardening Articles, new Heirloom Seed Offers, and healthy Juice Recipes. https://www.facebook.com/theseedguy/ Thank you, and God Bless You and Your Family. 🙂

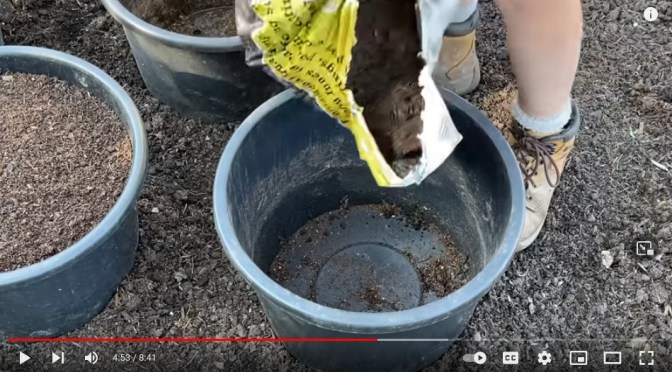
RELATED VIDEO: Homegrown.garden (How to Grow Potatoes in Pots)

Photo: Screenshot Homegrown.garden @ Youtube

Go here for other posts of interest

Use This Companion Planting Chart to Help Your Garden Thrive

From livelovefruit.com

Most people plant their gardens with little thought as to what plants grow well together. The secret to an amazing garden, though? Companion planting! 

Companion planting not only takes nutrient uptake into consideration, but it also brings into account crop protection, pest management and positive hosting (aka. increasing the population of beneficial insects that will help manage your harmful pest population). 

For this very reason I created an interactive companion planting chart that will help you plant the perfect garden (and maybe even make your neighbors a little jealous!). But before we get into that, we need to understand what companion planting is, and why it works so successfully!

Image by congerdesign from Pixabay

An Easy Beginner’s Guide to Growing Kale

From gentleworld.org

Any guide to growing kale will start out by telling you it is a cold weather crop, which tastes best after it has been touched by frost.

While cold weather may be kale’s preference, you can grow it during any season and in most climates. The flavor, output and duration from seed to harvest will change depending on the temperature, weather patterns, variety and soil condition, but kale is a hardy crop that is willing to adapt to our expanding desire for it.

With that said, it can tolerate temperatures as low as 20F degrees, but will start to turn bitter and become tough in temperatures over 80F degrees.

If you plan to plant from seed, you may need up to six weeks before your seedlings are ready to plant.

So… let’s get growing!

READ AT THE LINK

An Easy Beginner’s Guide to Growing Kale

Image by azboomer from Pixabay

More magic for your garden (Wally Richards)

Last week our article was about Magic Botanical Liquid (MBL) and how this natural product made an incredible difference to your plants and gardens.

Then a few weeks back we used information from a reader about how he greatly improved his fruit trees with another natural product ‘Apple Cider Vinegar’.

Lets now add another Magic product that is as common as salt.

In fact it is salt, raw, unrefined salt from the blue waters of the Ocean.

The deep blue water of the ocean is rich in minerals and elements, in fact all the 114 elements known to man. These elements are also in perfect balance for living organisms, health and well being.

Back in the 60’s/70’s a Dr Maynard Murry did a incredible amount of research into ocean solids and wrote the book ‘Sea Energy Agriculture’ Nature’s Ideal Trace Element Blend for Farm, Livestock and Humans. It is currently published by Acres USA.

Maynard dissected hundreds of ocean creatures and never once found tumors or disorders in their organs.

Doing the same to fish from streams and lakes, many were found to have tumors etc.

In one case he dissected a 100 year old whale and found its organs in pristine condition as good as a newly born whale.

Maynard realised it was the ocean water, rich in minerals that allowed the creatures living in it to be so free of the ills that effected land creatures.

We know that at various times, all land masses were for periods of times, under the sea.

When a land mass arises from the sea it is mineral rich and once plant life establishes on the land it too is rich in minerals.

But over time through rain, erosion and leaching a lot of the minerals gained by the land are lost back into the sea. It is interesting to note that in isolated pockets on the planet, where because of the terrain, that leaching does not take place.

People living in these pockets more often than not live to over a 100 years of age, in excellent health.

The reason, Maynard says, is because of the mineral rich diet they have, which allows the cells of the body to replicate perfectly, slowing right down the aging process and maintaining very healthy organs.

Maynard believed that if you give a plant all the possible minerals and elements it may need to grow as it should, then that plant would not be susceptible to diseases common to it.

Trials proved this point by supplying Ocean Solids to say nectarine trees in a row. Every second tree received the solids, the others being the controls. Then curly leaf disease was sprayed over all the trees.

After three years the controls had all died and the Ocean Solid trees never showed any signs of the disease. A number of similar trials were done on various plants with the same results!

Maynard took this a stage further by growing various crops of grains and feeding them to 200 female mice (C3H) that had been bred to always develop breast cancer which causes their demise.

200 more of the same C3H mice were fed conventional foods of whom all died within the normal 9 month period that their condition dictated, during which time they produced the normal two or three litters. (all to die later)

The Ocean Solid fed group were sacrificed at 16 months and a definitive examination revealed no cancerous tissue. This group also produced ten litters and no sign of the cancer in the off spring! The Ocean Solids foods had removed the cancer.

If we take this to the next stage then people that grow their own vegetables and fruit with Ocean Solids will be able to have in their food chain all the minerals that those vegetables are capable of taking up.

Maynard found that vegetables etc were capable of taking up about 20 to 40 odd elements dependent on the type of plant.

On the other hand wheat and barley are capable of taking up all the 114 odd elements if available. This is why wheat grass juice has become a very important plant in our health/ food chain.

Two aspects of this have become very important in my concerns for plant health and people’s health.

If we use Ocean Solids in our gardens along with other natural plant foods, building up the soil life populations, including the worms,

then we will have very healthy plants that will not suffer from diseases unless they become stressed for some reason, or reach the end of their days.

If we grow our own vegetables, fruit and wheat grass with Ocean Solids our health can greatly improve, markedly reducing the possibility of many ills such as cancer.

Think of it, healthy roses, plants and gardens along with better health for you and your family.

WALLYS OCEAN SOLIDS, USE AT: New or existing gardens; 35 grams per square Metre on gardens, sprinkled on and watered in. Use at the above rate for first year and then at half the rate for years 2 to 5.

No further applications then for 5 years. Scoop supplied with product is 70 grams when filled to slightly heaped.

For traysor container plants use at a tablespoon per 4.5 litres of growing medium. (Scoop does 18 Litres Mix)

SPRAY APPLICATION: One tablespoon to 4.5 Litres of water spray over foliage to run off. The Purpose for the spray, is as a natural insecticide, fungicide and foliar feed. Use only Bi-Monthly and late in day when sun is off the plants.

PLANT FOOD: Use at 1 gram per Litre of water. (Also same for adding to Hydroponic solutions)

Wheat Grass For Juicing: A must to be added to a good animal manure based compost, at the table spoon per 4.5 litre rate. Wallys Unlocking your Soil can be added also and watered in with MBL.(Magic Botanic Liquid).

Wallys Ocean Solids are solar dried only, with no further refining, to ensure that as many of the mineral and elements possible, are present in this product.

Bear in mind that the above use rates on to gardens will over time, with other natural products, bring up the health levels of the plants.

Some plants will respond fairly quickly where others may take a season or two to see really good changes. Plants in stress because of lack of moisture etc can still have problems, even with this program.

A reader this week contacted me in regards to Wallys Ocean Solids.

I was told that he has been using the Ocean Solids for a few years now spraying the vegetables every two months and the results have been wonderful.

The same spray can be used on roses, flowers and ornamentals.

MBL can be added to the Ocean Solid Spray.

My goodness you will have gardens so good you will not need my advise anymore.

There are some important BITS if you email especially what is happening to our NZ Health System and Hospitals.

Phone 0800 466464
Garden Pages and News at www.gardenews.co.nz
Shar Pei pages at  www.sharpei.co.nz
Mail Order products at www.0800466464.co.nz

Photo: envirowatchrangitikei

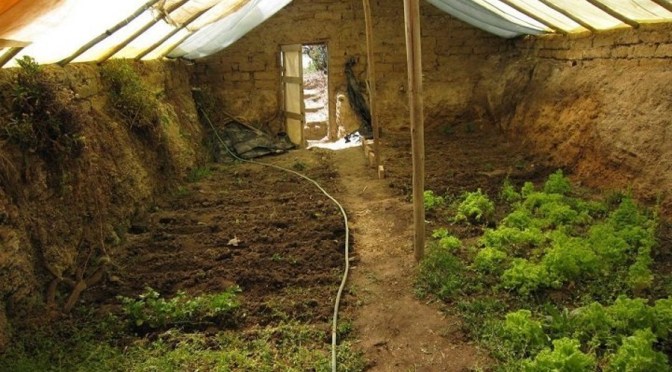
GROW YEAR ROUND WITH AN UNDERGROUND GREENHOUSE

Excellent info thanks to The Seed Guy @ Facebook. Not an idea I’ve ever seen before. Brilliant if you wish to cover your plants. Becoming a necessity now with all the overhead spraying going on. EWR


If eating Fresh Vegetables and Fruits Year Round is important to You and Your Family, you might consider building an Underground Greenhouse. It will keep the temperatures warmer in the Winter and help prevent overheating in the Summer; making it possible to grow your garden vegetables year round.

For the vast majority of the country, 4 feet below the surface will stay between 50° to 60°F even if the weather above the ground gets to 10°F or colder. This is what they call the thermal constant, and what the Underground Greenhouse is based on.

The original design for an Underground Greenhouse was invented in Bolivia, and was called a Walipini, an Aymara Indian word which means “a warm place.” A Walipini is a rectangular shaped Greenhouse that is dug down 6-8 feet deep in the ground. The longest area of the rectangle will face towards the south (in the Northern Hemisphere) to take advantage of the most sunlight.

The design of the Underground Greenhouse isn’t that complicated, as it can be as simple as a hole with plastic sheets laid on top. The roof seals in the heat and insulates the area to keep a warm, moist environment for your fruits and vegetables.

The location of your Walipini will depend on how big you want it to be. You’ll need enough space to grow your plants and have a small area to walk into your greenhouse. The bottom of the Greenhouse will need to be at least 5 feet above the water table in your area. The recommended size for an Underground Greenhouse is 8 x 12 feet.

When planning where your Greenhouse will be located, remember that your roof will need to receive light during the winter, also. This means that you will have to make sure that trees or buildings don’t block it during the winter time when the sun is in the South. In most cases, your Underground Greenhouse should be set up East to West, with the roof facing South to take advantage of the Winter Sun.

Once it’s decided where your Underground Greenhouse will be located, you can start digging. Plot out the area above ground to keep track of where you should be digging. While you’re excavating, dig at least 2 feet deeper than your desired depth. Keep your soil close by to help prop up the roof.

The walls of your Underground Greenhouse should have a minimum 6-inch slope from the roof to the floor. This will greatly reduce the amount of crumbling and caving that will occur with the soil. You can also layer the walls with a clay to prevent erosion, or use bricks to stabilize the walls of the building.

While you’re digging the hole, dig an extra 2 feet below the desired depth. You’ll fill this area with stone or gravel and then 8 inches of soil. Ideally, you’d lay larger stones and gravel on the bottom layer and the gravel would become progressively smaller until you reach the soil.

The bottom of the greenhouse should be slightly sloped from the center to the edges. Along the perimeter, you should leave a space of 2-3 feet just filled with gravel. This is designed to help the water drain more easily. Many people have also created open gravel wells in the corners of the greenhouses that allows them to collect the water. This will allow you to draw a bucket into the hole and pull out water if you find you have too much.

Once the floor is filled in with the drainage system, and the soil required for growing, the doors can be installed. Place the door frame at the base of the ramp and fill in the areas around the door as much as possible with dirt and clay. Filling in these gaps will prevent heat loss in your greenhouse.

Many times, people will use 2-inch door frames that have holes drilled into the top middle and bottom of each side. They will then use wooden stakes, dowels or rebar to secure the door frame into the soil wall.

The angle of the roof will make a big difference on the sun’s ability to heat your greenhouse. Ideally, the roof should be facing directly at the winter solstice at a 90 angle. This angle will maximize the heat during the winter solstice and minimize the heat during the summer solstice.

Now, you can use that extra soil that you have left over to create a berm. The berm is basically an extension of the north wall of the greenhouse. This allows you to control the angle of the roof by adding or taking away dirt. Build up the berm to continue the slope that you used on the wall. If you’re using bricks – continue using them on the berm.

The most economical, durable material for your roof is 4-inch PVC pipe. Using PVC elbow pieces, joiners, etc, you can create a flat roof frame that will cover your Underground Greenhouse.

After you’ve created a PVC frame, lay it in place on the top of your hole. Then lay plastic sheeting across the top of the frame and make sure that it extends past the edge of the frame by at least 1 foot. This flap will prevent run off water from the roof from running back into the greenhouse itself.

Once the plastic material is put on top of the roof frame, move inside and tack another layer of plastic wrap along the inside of the roof frame. This internal plastic sheeting will create a 4-inch barrier between the inside and outside of the roof, and will act as an insulator that will keep the heat in more effectively.

You’ll want to make sure that you leave a few inches of plastic hanging down on the lower (south) end of your roof. This will force moisture that collects on the roof to drip off above the drainage system or on top of your plants instead of at the base of the roof. If you allow the moisture to run to the base of the roof frame, it may affect the soil at that location and break down your wall, etc.

Ventilation is always crucial. You have 3 options, such as: Installing two doors, one at each end; installing a vent roughly the size of the door at the top of the back wall; or installing a chimney at the center of the back wall. Good Luck on your Greenhouse.

If you LIKE US on our Facebook page, you will be able to see more of our great Gardening Articles, New Seed Offerings and healthy Juice Recipes. Thank you and God Bless You and Your Family.

SOURCE

The Seed Guy @ Facebook (follow The Seed Guy to purchase seeds if you’re in the US plus more great info on gardening)

https://www.facebook.com/theseedguy

Photo: The Seed Guy @ Facebook

Go here for other posts

Bring a little Magic to your gardens (Wally Richards)

How would you like to bring a little Magic to your gardens, all plants as well as your house plants?

There is a very simple way which many gardeners have found to their delight; MBL – Magic Botanical Liquid.

You could call it Magic Prehistoric Compost Tea as it is derived from sediment that was formed millions of years ago when the planet was new and bursting with life.

Things grew ginormous back then plants were several times larger than their counter parts of our times and the animals or dinosaurs were in most part monsters as well.

What made them so?

It was the rich minerals of the time along with the highest levels of CO2 the world has ever known.

CO2 varied between 2000 to 4000 ppm 65 million years ago.

We currently are only 387 to 420 ppm which means plants do not grow as big as quickly as they did 65 million years ago.

That is except in commercial glasshouses were we use CO2 generators to pump the gas into the house and speed up growth and size of crops.

It is an interesting cycle as plants absorb CO2 and release oxygen, we need oxygen to breathe and we expel CO2!

So if we use logic to the common denominator and we reduce CO2 we have smaller plants (combine this with massive deforestation) Less OXYGEN for us.

If you want to find out how that feels without having to climb mount Everest where at high altitudes there is much less oxygen then take a paper bag and breath in and out into the bag for several minutes.

Your brain will become deprived of required amounts of oxygen you will feel sleepy, lose concentration and your body functions will start closing down. Organ damage will start to occur as your blood is now not carrying oxygen to the cells only CO2. Not good.

Oceanic plankton which provide about half the worlds oxygen but most of that is used by the marine life.

A problem also lies in the oceans called algae bloom which when it dies it uses more of the ocean produced oxygen than can be replenished at that time.

This can create extremely low oxygen concentrations, or hypoxia which are dead zones as no marine life can live there.

We see algae blooms occurring in NZ as a result of nitrogen and phosphorus run off combine with temperature, sun light and low flow of water makes perfect algae bloom conditions.

So the old saying; breathe out and make a plant happy (and grow) is very true.

Everything in Nature has natural balance we need oxygen and plants need CO2, the more CO2 the bigger the plants, the bigger the plants the more oxygen we have to breathe.

So if you go for a walk in the park where there are lots of trees and plants or better still go for a walk in the bush and you will feel good as a result of higher concentrations of oxygen for you to breath in.

Back to our Magic… My partner has a lot of house plants which she started collecting in the last year or so and recently her friends commented on how really big they had grown and healthy they are.

They want to know her secret which turns out to be MBL that she adds a little to the water every now and then when watering them.

That is why I have been prompted to write again about MBL.

Other interesting comments from gardeners have been: Regular spraying of roses with MBL has reduced considerably leaf diseases and now some roses have perfume never detected previously.

Seedlings produced to sell only take about half the time as they did without MBL.

Seeds germinate far quicker in one case pumpkin plants from seed in one day.

Vegetable crops twice the size in just about half the time.

Combine MBL with Mycorrcin or/and molasses and increase the effectiveness of both growth and less diseases. Why? It is MAGIC.

MBL ( Humate and Fulvic acid ) is a growth booster for plants, it makes for much bigger root systems, stronger and healthier plants.

It is been used with balanced NPK fertilisers to create world record vegetables in America such as 26.7 kg Celery and a 14 kg cauliflower to mention two of many.

If you are into growing record breaking vegetables for shows this could be for you.

Benefits may include; Aids and speeds up germination of seeds.

Helps to release locked up fertilisers from past applications especially phosphates.

Helps increase availability of chemical fertilisers and organic foods for plants.

Helps reduce many common plant disease problems.

Helps clean up many toxic compounds, chemicals and oil spills in soil.

Helps to establish plants in areas where they cant or struggle to establish.

Stimulates growth of soil micro organisms.

Increases root respiration and formation.

Increases availability of micro nutrients.

Can increase permeability of plant membranes, which will enhance nutrient uptake.

Increases vitamin content of plants.

Improves seed germination.

Accelerates root development.

Stimulates plant enzymes.

Contains a number of trace elements such as Si, Mg, S, Mn and more.

Increases ability for photosynthesis.

Contains silica which strengthens cell walls, helps block disease and regulates cell temperature which increases drought and frost tolerance.

Increase pH buffering properties of soil.

Retains and releases water soluble fertilisers for plants when needed.

Increases soil aeration.

Improves soil structure.

Makes soil more friable.

Has a capacity to detoxify chemical residues and heavy metals.

A powerful, natural chelating agent.

Improves taste and shelf-life.

Fulvic acid can promote prolonged production, as it tends to delay the aging process.

Fulvic acid increases the metabolism of proteins.

Used at the rates of 20ml per litre as a soil drench as required and 10ml per litre as a foliar spray once or twice a month.

A must for roses, tomatoes and all vegetable and fruit crops.

Green keepers are using it for better turf so onto the lawn for better healthier lawns.

If you have brown patches on the lawn where dogs have urinated use MBL to help restore or re-establish grass.

MAGIC

There are some bits for inquiring minds if you email me back a request.

Phone 0800 466464
Garden Pages and News at www.gardenews.co.nz
Shar Pei pages at  www.sharpei.co.nz
Mail Order products at www.0800466464.co.nz

New Zealand Bill of Rights Act 1990. Part II of the Act covers a broad range of Civil and Political Rights. As part of the right to life and the security of the person, the Act guarantees everyone:

1The right not to be deprived of life except in accordance with fundamental justice (Section 8)

2The right not to be subjected to torture or to cruel, degrading, or disproportionately severe treatment or punishment (Section 9)

3The right not to be subjected to medical or scientific experimentation without consent (Section 10)

4The right to refuse to undergo any medical treatment (Section 11)

 Furthermore, the New Zealand Bill of Rights Act 1990 guarantees everyone: Freedom of Thought, Conscience, and Religion.
This includes the right to freedom of thought, conscience, religion, and belief,
INCLUDING THE RIGHT TO ADOPT AND HOLD OPINIONS WITHOUT INTERFERENCE (Section 1)

Photo: pixabay.com

STRAWBERRY TIME (Wally Richards)

May is the traditional month when new seasons strawberry plants become available in garden centres.

The nurseries that grow the plants lift them after the autumn rains have moisten the soil sufficiently, then they are distributed to garden centres.

In seasons when the growing beds remain too dry then the plants are not lifted till later, making for late plantings.

I find that the sooner you can get your new strawberry plants into their new beds the better results you have in the first season.

Like all things planted it is root establishment that is so important.

When planting place about a teaspoon of Wallys Unlocking your soil in the planting hole with a pinch of BioPhos for each strawberry plant.

Alternative is broadcast the label amounts over a bed when preparing for planting.

Gardeners with existing beds of strawberries will likely have a number of runners that have rooted in nicely, these can be used for new season plants..

If the existing strawberry bed is not congested with old and new plants and there is ample room still for all the plants to grow and produce,

then you can get away with not lifting the runners or only lifting those that are too close to existing plants.

Strawberries are easy to grow and can be grown in open ground or containers.

In open ground the most practical way is to make a bed with wood surrounds 16 to 20 cm tall and have a hinged frame over the bed that has either

plastic bird netting or wire netting over the lid.

The whole frame needs to only sit on the soil so it can be moved if required.

If using tanalised timber for the surround then after cutting to size; paint all the wood with a couple of coats of acrylic paint to prevent chemicals leeching into the soil.

Strawberries can be grown in troughs about 16 to 20 cm wide and similar depth then as long as required. I like to hang these off the top wooden rail of a fence.

Special strawberry planters made from clay or plastic are not very good and your results are likely to be poor.

(Thats the types where plants are placed in holes around the container as well as on top.)

Polystyrene boxes with holes in the bottom are also ideal containers for good crops if they have a rooting depth of 15cm or more.

The growing medium should be a good compost such as Daltons or Oderings to which you can add untreated sawdust and a little clean top soil or vermicast.

(Worm casts from a worm farm)

A mix of about 75% compost, 20% sawdust and 5% vermicast is good value.

Mix the above in a wheelbarrow then place a layer of the mix 5 cm deep in the base of the trough or container.

Now sprinkle a layer of chicken manure, some potash, BioPhos, Wallys Unlocking your Soil and Ocean Solids. Horse manure is also very good.

If you do not have chicken manure available use sheep manure pellets and blood & bone.

Cover with more compost mix to a depth suitable for planting your new strawberry plants.

A similar process can be applied to a open bed with a frame, though the frame height may need to be taller than previously suggested.

Ensure that the soil at the base of the frame is free of most weeds and then place a layer or two of cardboard over the soil. This will help prevent weeds from coming up in the bed, then fill as suggested.
There are a number of different varieties of strawberry plants available to the home gardener, newer varieties such as Chandler, Pajaro and Seascape and Albion which I especially favour..

The Albion strawberry (Fragaria x ananassa “Albion”) is known for its fruits, which have a uniformly conical shape, bright red color, reliable firmness, and surprisingly sweet taste.

Albion strawberry plants grow quickly to about 12 inches (30.5 cm.)

Different varieties will do better or worse in different climates so choose the ones most suited to your area of the country.

Strawberry types include:

Strawberry Baby Pink ™ Producing stunning beautiful pink flowers followed by small to medium red fruit with sweet traditional flavour. Large bunches of berries ripening over a long period.

Habit – Compact strong growing strawberry. Size – Give these small to medium plants close spacing.

Pollination – Self-fertile. Unknown if short day, neutral or long day type.

Strawberry Camarosa; Large to very large medium dark red fruit. Firm medium red flesh with excellent flavour. Conical shape.

High resistance to wet weather. Habit – Suitable for Northern and Central districts. Vigorous growth habit.Size – Give these vigorous plants wide spacing.

Pollination – Self-fertile. Short day type – flowers are initiated by short day lengths.

Harvest – Fruit ripen 20-35 days from flowering depending on climate, with light crops in early summer, followed by a main crop in December – January. Yield is very good.

Strawberry Chandler; Small to very large medium red fruit. Firm light red flesh with very good flavour. Conical shape. High resistance to wet weather.

Habit – Suitable for Northern and Central districts. Multi-crowned growth habit.

Size – Give these multi crowned plants medium spacing. Pollination – Self-fertile. Short day type – flowers are initiated by short day lengths.

Harvest – Fruit ripen 20-35 days from flowering depending on climate, with light crops in early summer followed by a main crop in December – January. Yield is very good.

Strawberry Sundae ™ Large red fruit with excellent flavour. Firm red flesh in an oval shape.

Habit – Suitable for Northern and Central districts. Vigorous growth habit. Size – Give these vigorous plants wide spacing.Pollination – Self-fertile.

Short day type – flowers are initiated by short day lengths.

Harvest – Fruit ripen 20-35 days from flowering depending on climate, with light crops in early summer followed by a main crop in December – January. Yield is average.

Strawberry Supreme ™ Very large bright red fruit. Very firm red flesh with excellent flavour. Conical shape. Good resistance to wet weather.

Habit – Suitable for Northern and Central districts.

Moderately strong growth habit. Size – Give these small to medium sized plants close spacing.

Pollination – Self-fertile. Short day type – flowers are initiated by short day lengths.

Harvest – Fruit ripen 20-35 days from flowering depending on climate, with light crops in early summer followed by a main crop in December – January. Yield is very good.

Strawberry Temptation™ Medium bright red shiny fruit with excellent flavour. Pale firm flesh.

Habit – Compact strong growing strawberry. Tough and resilient in relation to pest and diseases.

Size – Give these medium plants close spacing.

Pollination – Self-fertile. Only NZ bred Day Neutral strawberry which means they will set fruit regardless of how long or short the days are making this an ideal fruiter national wide.

Will extend the North Island season. Harvest – Consistent high yields of berries ripening over a long period from October to March.

To enhance your strawberries and increase the crop yields by 200 to 400% drench the bed with Wallys Mycorrcin after planting and repeat again in a couple of months time.

Spray the plants with Mycorrcin soon as planted and then every two weeks till end of season. Add Magic Botanic Liquid to the Mycorrcin Spray.

An occasional monthly spray of Wallys Perkfection will help prevent dry berry (Downy Mildew) and other diseases.

For bigger berries you may like to try Wallys Secret Strawberry Food. End

Email me for some interesting Bits of News not available through the Media.

Phone 0800 466464
Garden Pages and News at www.gardenews.co.nz
Shar Pei pages at  www.sharpei.co.nz
Mail Order products at www.0800466464.co.nz

Photo:congerdesign @ pixabay.com

Grow Mushrooms at Home In A 5 Gallon Bucket (Easy – No Sterilization!)

FreshCap Mushrooms

Growing mushrooms can be complicated- but it doesn’t have to be! In this video, I go over one of the simplest methods of growing mushrooms that pretty much anyone can do at home. All you need is: + A 5 Gallon Bucket + Aspen Wood Chips (even from the pet store!) + Oyster Mushroom Grain Spawn Happy growing! Check out the full article here:
https://freshcap.link/bucket-tek-yt
Check out our new growing blog: https://learn.freshcap.com/growing/ Learn About Functional Mushrooms: https://learn.freshcap.com/mushrooms/

WATCH AT THE LINK:

https://www.youtube.com/watch?v=45b2t7fqhjA&t=3s

Photo: congerdesign @ pixabay.com

SOLVING GARDENING PROBLEMS (Wally Richards)

A tip that I was given, which I am going to try myself this spring, is in regards to curly leaf in stone fruit such as nectarines and peaches in the spring.

You simply place a quarter a teaspoon of Condys Crystals (potassium permanganate) per litre of warm water with one mil of Raingard and spray the trees and the soil underneath in spring prior to leaf show and every 10 to 14days later for the couple of months when the disease is active..

The lady gardener that told me swears by it for control.

The potassium permanganate is a oxidizing agent that kills fungi, the Raingard prevents the rain washing it off for up to 14 days.

It is during rain that the disease attacks, lifted up onto new leaves by the splashing water.

Potassium permanganate is locked in the film of Raingard which slowly breaks down under UV.

The potassium permanganate is neutralizing the spores of the curly leaf disease as they come in contact.

You will need to spray to keep the newest leaves protected, as well as the existing ones as they grow larger, so depending on growth rate spray every 7 to 14 days.

If you try this method this year please let me know the results.

Another gardener uses the same on their roses with great results starting with a spray in winter after pruning and a 2 weekly spray during the season of the foliage and soil as required.

A lot of gardeners have glasshouses or tunnel houses to extend the growing season of tomatoes and other plants.

Some grow in the soil in the glasshouses where others will grow in containers.

Soil in a glasshouse can harbor diseases or what we call pathogens. These love a chemical/acidic environment where they can thrive.

Beneficial microbes and fungi love a alkaline, chemical free environment so the use of chlorinated tap water, chemical sprays along with herbicides are going to create problems for your tomatoes and other plants.

Chemical sterilizing the soil with Basamid is no longer an option since the chemical was banned.

I have in the past suggested potassium permanganate with salt as a soil drench but this takes out both the beneficial and the bad.

Some gardeners dig out the soil and replace it with new soil which is not only a lot of hard work but you cannot be sure the new soil will not have its own problems especially weed seeds.

A new product called Terracin is the natural way to clean up soil diseases.

Mix the Terracin at 2ml per litre of water and apply to one SqM of moist soil.

Or mix at 20ml to 10 litre to water over 10 SqM of moist soil.

Terracin uses a combination of a Bacillus amyloliquefaciens BS-1b, a beneficial soil microbe and the enzymes, bacteriocins, secondary Metabolites & signal molecules from the fermentation of Enteroccocus faecium to suppress a broad range of fungal pathogens.

During the next 3 weeks keep the soil moist (not wet) with non-chlorinated water.

After 3 weeks we need to feed and build the populations of beneficial microbes so we apply Mycorrcin to feed them.

Once you have done this its a matter of not using chemicals in the glasshouse including chlorinated water.

A Special filter can be attached to your hose to remove the chlorine which is the same as what I have been using for several years.

The next problem in a glasshouse is the sheltered environment which is very good for insect pests to breed.

During the growing season you have to keep them in control with the following: sticky yellow whitefly traps, Neem Tree Granules, Wallys Neem Tree Oil and Wallys Super Pyrethrum so they will not get completely out of hand.

Fumigating the glasshouse at the end of the season to kill all the pests that are harboring over in cracks and places means a clean start in the new season.

Wallys Sulphur Powder is available for this purpose.

This is ideal for fumigating a glasshouse in winter when there are no crops growing. (May dehydrate and kill plants so empty the house first.)

If you have plants that you are going to pull out anyway then leave them in the house when you burn the sulphur which will kill the pests on them rather than take them outside to affect your other gardens.

To use: Close all vents in the glasshouse.

Place an amount of sulphur onto a steel hearth shovel and light. It is hard to light unless you have a very strong flame.

You can aid this by putting a little mentholated spirits on part of the sulphur and light that.

Once it starts burning it is hard to stop.

Place the burning sulphur in the middle of the house and leave immediately.

Close the door and let the sulphur fumes do their job. Leave house closed for a few days.

The amount of sulphur burnt will depend on size of the glasshouse.

For a house 2.5m x 2.5 m burn about 50 grams of sulphur.

I did this last winter after cleaning all the plants out of my glass houses and once outside it was a sight to see so many whitefly and adult psyllids beating up against the glass trying to escape.

Likely burning sulphur safely in out buildings for cluster flies in winter would be a good way to control them also.

Hen houses for mites when the hens are locked outside then later air the house and dust Sulphur powder over the perches and floor.

   You can make a big difference to your soil, gardens and plants by using Bio Marinus™.

Bio Marinus™ is manufactured by the enzymatic hydrolysis of fish offal, blended with humate, seaweed and biology including Bacillus subtilis, Trichoderma, mycorrhizae fungi etc.

Designed to provide a high quality, cost effective fertiliser.

At only $15.00 a one litre container that includes a range of beneficial microbes…. it is high value at low cost.

Biologically active soils have the ability to retain moisture and release nutrients ensuring greater production, faster rotation and more rapid recovery from stress. To build a healthy biological soil we need products that can feed living organisms.

Biological fertilisers increase nutrient availability and feed important soil organisms, such as earthworms and microorganisms (fungi and bacteria) – all essential for plant and soil health.

Soil health and soil fertility requires much more than NPK fertiliser.

Without the right biology, plants and animals cannot reach their full potential. Biology is essential for the recycling of nutrients and the fixing of atmospheric nitrogen.

Drench your soils now with this great product and see the difference in the health of your gardens this spring.

You can Super Charge Bio Marinus™ by adding some molasses or unrefined sugar to your soil drench mix.

This feeds the microbes and explodes their populations. Caution if adding do not store in a sealed container as the populations will balloon and even explode a plastic container.

Add the molasses dissolved in some hot non chlorinated water then add the Bio Marinus™ and use immediately.

If you have Magic Botanic Liquid (MBL) that can also be added to the brew for even greater results. END

For those that are interested there are BITS ( Items they likely don’t want you to think about)..just email me and ask for them

Phone 0800 466464
Garden Pages and News at www.gardenews.co.nz
Shar Pei pages at  www.sharpei.co.nz
Mail Order products at www.0800466464.co.nz

Photo: pixabay.com

Garlic planting time (Wally Richards)

Garlic cloves are traditionally planted on the shortest day of the year (which is getting close; the 20th June) to be harvested on the longest day 21st December.

Any time from mid-May to mid-July is good for planting your garlic cloves..

There are ample good reasons to grow garlic; from its health benefits to the aromatic flavoring and taste that the gloves give to your meals.

You could not have garlic bread without garlic!

Garlic used to be an easy crop to grow before the dreaded Garlic Rust struck everyone about 3-4 years ago.

The rust has made garlic growing for commercial and home gardeners much more difficult but there is a solution that I developed and used last year called Cell Strengthening which is

achieved by getting good amounts of silica into the plants while they are growing.

More on this soon.

Planting your garlic cloves around this time and what you harvest 6 months later will depend greatly on what you do at planting time and during the growing season.

The best place to plant is in a sunny sheltered spot. Garlic loves frosts so no protection is needed.

Soil preparation: Garlic prefers a friable soil so that its roots can penetrate and the bulbs can swell easily.

I loosen up the top soil with a rake or hoe to make a fine tilth.

Then sprinkle BioPhos, gypsum, Wallys Unlocking the Soil, Blood & Bone, Sheep Manure pellets (Or chicken manure if you have it) and Wallys Ocean Solids over the area and rake it in.

I then place the cloves about 6cm apart into the soil with their points facing the sky.

Then I cover the cloves carefully with purchased compost such as Daltons or Oderings so that the cloves are covered and buried about 25mm under the compost.

I then sprinkle some Unlocking your soil over the compost.

When the first leaves from the cloves appear above the mulch then make up the Silicon and Boron Cell Strengthening Soil Drench mixed with water and give each plant a drench

over the foliage and into the root zone.

You will repeat this again about a month later.

What we are doing is getting a good amount of silicon into the soil which will be taken up by the roots of the garlic because of the boron additive.

With the foliage up you can now start a spray program by mixing the Silicon Cell Strengthening spray with the Silicon Super Spreader together into a trigger spray with water.

I like to add Magic Botanic Liquid (MBL) to this spray for its many benefits.

The spray once made up keeps well and you only need to shake it each time prior to application over the garlic foliage.

Spray regularly while the garlic is growing once or twice a week.

Now is the time you will apply a mulch over garlic.

Garlic loves mulch and mowed leaves are ideal.

There are ample leaves around at this time of the year and these can be run over with a rotary mower and the resultant shredded leaves layered over the compost.

Alternative would be either pea straw, weed free grass clippings or more good compost.

Make a mulch layer about 5cm thick.

After this keep the area between the garlic bulbs free of weeds.

When the foliage pops through the mulch you then spray regularly with the Silicon Cell Strengthening spray with the Silicon Super Spreader.

Once a week or more often it you are passing.

The Silicon and Boron Soil Drench comes in a 500 mil bottle used at 10mils per litre to cover one sqM of area. (Shake well before using)

The Silicon Cell Strengthen spray is in a 250mil bottle mixed at 5mils into one litre of water with one fifth of a mil of the Silicon Super Spreader added per litre.

(1 mil into 5 litres of water with 25 mils of Cell Strengthening spray) A 1mil pipet is supplied for measuring.

Alternative you can obtain a 500 mil bottle of Cell Strengthening Spray with the spreader already added.

Used at 5 mils per litre of water. I make up the spray in a one litre trigger sprayer and leave it where the garlic is growing and give it a shake and spray.

Using the above products last season there was no sign of any rust during the whole growing time and harvested rust free. (Products are available on our Mail Order web site)

The silicon cell strengthening products are ideal for tomatoes, potatoes and other plants affected by the psyllid. The spray can also help control curly leaf disease on stone fruit.

Traditionally harvesting of garlic is on the longest day of the year ( 21st December).

It is better to wait harvesting till after the all leaves start to go yellow, which often happens around mid-January.

Harvesting earlier might mean the bulbs aren’t as big as they could be.

Harvesting later might mean the bulbs split, or in extreme cases start to deteriorate.

To harvest, use a garden fork or something similar to loosen the soil, and just pull up the plant up gently by its base.

After lifting leave the leaves on, because during the drying process the goodness from the leaves goes in to the bulb, increasing its size and making it even more yummy and nutritious.

Clean off the dirt from the bulb and dry it for a few days lying on a dry surface in a dry area such as a carport, then store it by hanging in a dry place out of the sunlight.

Tying clumps of five or ten together by the leaves and hanging under a carport or shed roof works well.

When dry, the plant tissue is very absorbent and will even absorb moisture from damp air and turn mouldy.

Once nice and dry I prefer to store the bulbs indoors in a cardboard box in a dry room or shed where condensation is not a problem.

If you would like to find out the history of garlic there is an excellent web site at:

http://www.ncbi.nlm.nih.gov/pmc/articles/PMC3249897/

Black aphids are about the only pest to have a go at your garlic as these aphids prefer onions, shallots, garlic and lettuces.

As soon as noticed spray with Wallys Super Neem Tree oil with Super Pyrethrum added.
END.

There are some very interesting BITS if you would like to know about what commentators are asking/saying,  then email me and ask for them.
Phone 0800 466464
Garden Pages and News at www.gardenews.co.nz
Shar Pei pages at  www.sharpei.co.nz
Mail Order products at www.0800466464.co.nz

Photo: stevepb @ pixabay.com

12 Perfect Vegetables To Grow in a Shady Garden Space

When we think of vegetable gardening, we’re often convinced that FULL SUN is the only way we’ll be successful. This couldn’t be more wrong! There are plenty of shade friendly plants that will thrive in 2-5 hours of sun. On top of that, there are some plants that won’t LOVE being in shade, but will TOLERATE it, which allows you to squeeze out even more harvests from spaces you might typically ignore in your garden.

WATCH AT THE LINK

Photo: pixabay.com

USING NEEM TREE GRANULES AND POWDER IN THE GARDEN (Wally Richards)

In India the kernels of the Neem Tree are collected and cold pressed to extract the Neem oil which is used to control insect pests in agriculture and our home gardens.

The Neem Oil is not a poison so unlike chemical insecticides it does not poison the pests, the environment or the user.

Instead it acts as a deterrent and has the ability to prevent insect pests from feeding making it an anti-feedent and when a small amount is consumed by pest insects feeding on the plants sprayed with the oil they stop eating and starve to death..

Recently EPA came across an overseas study that suggested that the active ingredient in Neem Oil could be harmful to aquatic life.

Apparently there are other studies that show it is not but EPA has taken the precaution of having all brands of Neem Oil to be re-registered and while the applications are being scrutinised the Neem Oil brands cannot be marketed in NZ.

That is the reason the Wallys Super Neem Tree oil is currently removed from sale while our application is being approved.

Neem Granules and powder which in India are called Neem Cake does not have that problem and is used as a soil conditioner, fertiliser and pest deterrent.

The only difference between Wallys Neem Tree Granules and Wallys Neem Tree Powder is the particle sizes.

The powder is uniform size particles about 1-3mm where the granules is a mix of powder up to lumps about 30mm in size but mostly about 10-15mm.

The powder is ideal for using in the planting hole for seedlings, on the lawn and on smaller containers.

To deter carrot fly you sprinkle the power with the seeds when sowing and later when the tops are up about 4 to 5 cm you side dress the row with Wallys Neem Tree Powder.

It is fast acting, breaking down and needs to be reapplied about every 2-3 months.

The larger particles of Wallys Neem Tree Granules are slower to break down giving a much longer protection period of about 3 to 5 months.

This makes them ideal for placing in the root zone of larger plants, roses, shrubs and trees.

I have been pleased with the effects that have happened when used on the soil surface in the root zone of citrus trees.

An application sprinkled from the trunk to the drip line cleans the tree of all insect pests within a few weeks of application.

I had a Lime growing in a container that was attacked by scale insects with a lot of ants over the plant collecting the honeydew the scale was peeing out.

A handful of Wallys Neem Tree Granules onto the growing medium and within a month no ants and no scale.

A couple of months ago a lady gardener from India living now in NZ told me how she has beautiful roses free of pests and most diseases and looking very healthy.

The secret she told me was to put about a handful of Neem Granules into a bucket of water.

Stir occasionally and then take the water and pour over your roses.

A natural food and deterrent bit like the article I wrote a few weeks back about mixing Apple Cider Vinegar with water and spraying over fruit trees.

If you are going to try the Neem Granules into a bucket of water I would also suggest you make it even better by adding a little Magic Botanic Liquid (MBL).

It has taken us 6 months to get a container load of Wallys Neem Powder/Granules from India to New Zealand because of all the upsets in the supply chains and lock downs.

Normally it would have only taken 6 to 8 weeks.

I asked my India supplier because the delays are so long now to arrange a second container.

I asked for that 3 months ago and they are still trying to find a shipping line to bring it to NZ.

Why is this the case?

Which apparently applies to both New Zealand and Australia, as our Governments make them stand off shore for long periods of time before they can dock into our ports.

While waiting to dock they use up fuel and have to pay their sailors wages for doing nothing.

A few gardeners have told me that using Neem Powder or Granules in their vegetable gardens has deterred cats from fouling the gardens.

Apparently the cats do not like the smell of the Neem.

This may work for some cats and be a deterrent but I have not had sufficient feed back to say it is greatly successful on most cats.

If you find by using it in gardens that cats stop fouling please let me know.

The product Wallys Cat Repellent which is naphthalene flakes works on about 95% of cats.

We are trying to bring a shipment from India but so far not having any success so out of stock.

None of the shipping lines want to handle it so trying to air freight it here if they can find a plane to bring it to NZ.

My advice to all you readers currently is to plant up food crops into any available ground and stock up on essentials as a world wide famine has started and things are not looking good.

Have an ample stock of vegetable seed varieties that you like to grow and store the packets opened or unopened in a glass jar sealed with a lid in your fridge.

Also seeds for growing sprouts which can be grown all year round for good nutrition as not subjected to day light hours like our vegetable crops for growth.

Have on hand a supply of MBL and Ocean Solids which a small amount of both can be added to the water that you use to do your sprouts to increase their mineral content.

There is an old saying ‘Prepare for the Worst and Hope for the Best.’

If you want a ‘Bit more’ information on current happenings email me.

Phone 0800 466464
Garden Pages and News at www.gardenews.co.nz
Shar Pei pages at  www.sharpei.co.nz
Mail Order products at www.0800466464.co.nz

Photo: pixabay.com

Back To Eden Gardening Documentary Film – How to Grow a Regenerative Organic Garden (MUST WATCH!)

A timely and amazing doco that is well worth the watch if you are wanting to grow your own food. A necessity with the current, increasing (& planned) shortages. Little weeding or watering. It will revolutionize your gardening! EWR


Dana & Sarah Films 34.8K subscribers

Back to Eden Gardening Documentary Film – Learn how to grow a regenerative organic vegetable garden the best and easiest way! Grow fruits and veggies with less labor, less watering, fewer weeds, and an extremely abundant harvest! Paul Gautschi, featured in the documentary Back to Eden, has popularized the use of free wood chip mulch from tree trimmings in vegetable gardens and orchards. Discover the regenerative organic gardening movement that has made millions of people worldwide love growing their own food by watching the film, streaming online for free!

OFFICIAL WEBSITE: https://www.backtoedenfilm.com BACK TO EDEN DVD: http://www.backtoedenfilm.com/buyback…

SUBSCRIBE: https://www.youtube.com/user/danasara…

FOLLOW ON INSTAGRAM: https://www.instagram.com/backtoedeng… FOLLOW ON FACEBOOK: https://www.facebook.com/BackToEdenGa… Back to Eden shares the story of Paul Gautschi and his lifelong journey walking with God and learning how to get back to the simple, productive organic gardening methods of sustainable provision that were given to man in the garden of Eden. The food growing system that has resulted from Paul Gautschi’s incredible experiences has garnered the interest of visitors from around the world. Never, until now, have Paul’s organic gardening methods been documented and shared like this! You will walk away from Back to Eden Film with the knowledge of how to plant an organic garden and how to grow your own food. Back to Eden gardening is the best gardening technique!

much more info at the link:

WATCH AT THE LINK

More info on controlling those garden pests (Wally Richards)

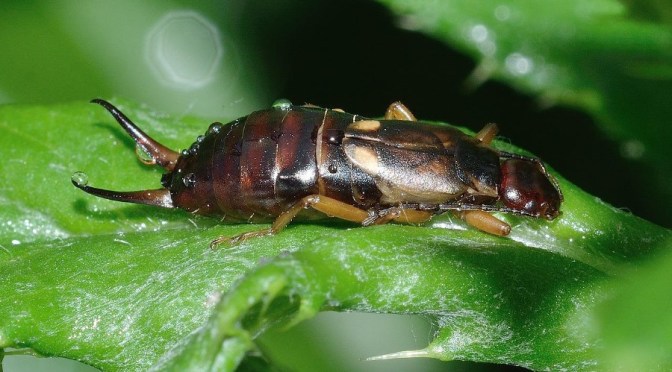
I am often asked about how to control populations of slugs and earwigs in gardens without using the usual chemicals.

This is particularly important in food growing gardens as we do not want to have poisons in the food we are eating.

You may not realise it but both earwigs and slugs do provide benefit to your gardens as they prefer decomposing plant material to living plants

so if you are clean and tidy and there are no rotting plants available then they will do damage to your growing plants.

When you are weeding if you leave some weeds on the soil to break down naturally then the two pests will become assets.

Sprinkling lawn mowing clippings onto gardens is another way of using what many consider a waste product to benefit.

One precaution with that is if the lawn grasses are seeding as you would then be putting a lot of new grass weeds into your gardens to germinate later.

If the slugs and earwigs (You can include with them slaters or as some call them wood lice) are a real problem then you could try the following.

I learnt about this method a long time ago and have often suggested to gardeners to use it.

What you need is some strips of 3plywood or similar about 250-300mm long and about 150mm wide.

These are laid down on the soil in areas where you are having problems with the pests.

Now you take a trigger sprayer and mix two parts bleach to one part water.

During the day you fold back the slats of ply onto their far edge and see what is hiding under them.

If you have some of the pests you wish to control simply give them a spray of your bleach and lay the ply back down on top of them.

Repeat the same process regularly until you have the pest population under control.

Slugs and snails cannot tolerate copper as it makes them dehydrate and die.

If either pest comes into contact with copper they will not pass over the barrier it creates.

So this can be used to protect seedlings from being their evening meal.

I suggest placing untreated sawdust around the seedlings you wish to protect then spraying the sawdust and seedlings with Wallys Liquid Copper and Raingard added.

Much safer than using toxic poisons to kill them and better for the safety of your pets and wild life.

There is another slug like pest which is commonly called the Cherry Slug or Pear Slug as it feeds on these trees during the summer period when they are active.

They start about November to December in most areas and can be seen as a small black slimy slug on the foliage which they are eating.

If you do not treat this first generation then in January to February there will be a second large wave of them and damage will correspondingly increase.

The best solution is to spray the foliage with Wallys Liquid Copper with Raingard added as they can not handle copper either.

Another one that can be used for snails and slugs is the mineral iron.

There is a slug and snail bait on the market that uses chelate iron as the killing component which means it fairly save for pets and wild life.

You can make a slug and snail bait yourself by soaking bran in a solution of sulphate of iron and water or if you have available use chelate iron.

Add to this yeast which is what attracts the pests and they will eat the bran which now contains iron and die as a result.

There is one pest that you will never gain complete control of if they are in your area and that is ants.

Many of the ant baits on the market are only effective for a little while as the ants become bait shy to them realising that the bait is what is killing them.

Many years ago I found a very old formula that ants never seem to wake up to the fact it is killing them.

We call it Granny Mins Ant Bait and the container has a combination of Borax and Boric Acid with the recipe on how to make it up.

The product is very inexpensive selling for about $7.00 and you just dissolve the jars contents in hot water and add the required amount of sugar and honey. It makes just about a litre of bait.

Stir well and place the mixture in small jar lids wherever you see ants.

Top up the lids as they empty till there is no more ant activity.

The bait should only be used outdoors and if you have any concern for pets then put a small amount of liquid ant bait into small jars and lay then on their sides on the ground.

The small amount of ant bait used is not likely to be harmful to pets but better safe than sorry.

If ants are inside your home then the easy most effective way is to set up one or more of those insect cans that release pyrethrum spray every few minutes.

As long as that can is operating and even for a few weeks after it has emptied no ants will come into that area.

They detect that there is pyrethrum around and know it is not good for them.

Cockroaches inside your kitchen are a curse for some people and the easy way to control them safely is to sprinkle Borax powder behind the fridge and stove.

Only use in safe places such as these two areas so it is well away from food stuffs and pets.

The cockroaches walk though the borax powder and being very clean insects they clean them elves of the powder which kills them.

Products mention are from Wallys Range of products and can be found in some garden shops or by Mail Order on www.0800466464.co.nz

If there is an interest in some non gardening news email me for the Bits that the media does not like you to know such as 3 waters anti-democracy.

Photo: francok35 @ pixabay.com

How to Grow an Indoor Survival Garden

Growing my own fresh fruits and vegetables is one of my favorite pastimes. I love to harvest the sweet bounty of my labors. Sometimes growing your own food is a requirement for survival and not just a pleasant hobby.

Can I grow food inside of my home? Tomatoes, cucumbers, peppers, herbs, lettuce, and greens can all be grown inside of your home with a little bit of knowledge, the right supplies, and some tender loving care.

My adventure in growing food indoors began this year when the pandemic hit, and I realized that I needed to up my game when it came to growing our own food. I am not new to the home production scene, but suddenly I was driven to make it more than a hobby.

READ MORE

https://theprovidentprepper.org/how-to-grow-an-indoor-survival-garden/?fbclid=IwAR29wk52Y_YQX_1HxdgF0RGPJrEQRuiYbQN91c18iWBtTdioHAOgolpx45s

Photo: jag2020 @ pixabay.com

Dealing with BRYOPHYTES (MOSS AND LIVERWORTS) (Wally Richards

Bryophytes and Embryophytes are the botanical names given to mosses, lichen, liverworts, hornworts, molds, algae and slime.

These are primate plant-like forms which were the first land type plants on the planet, millions of years ago.

It was as a result of these primitive plant forms that began the process of building soils from rocks splitting and powdered by the action of water and ice.

Members of this diverse plant family are found all over the world, many growing in places where no other types of plants could grow, so in a sense they are still creating growing conditions for higher plant forms to grow.

Many bryophytes are very attractive with feather or fern like structures where others look more like something from a alien landscape.

When bryophytes grow in places we do not want them to grow they become a nuisance just like weeds.

Lichen and liverworts appear to be able to grow on most surfaces including glass, public footpaths, fences and roof tiles which are favorite spots for them.

Vertical glass is difficult for them but glass roofs of glasshouses are not.

Algae and mosses growing on paths make for a slippery condition when wet and dangerous to us and can incur serious injury if we slip and fall.

Lichens that colonize on the trunks and branches of plants and trees look unsightly and can lead to rots and losses.

Mosses growing in lawns are another problem, not only making the lawn unsightly but also suffocating our preferred grasses.

More often than not, wherever bryophytes appear, it means a war to eradicate and control.

When action is not taken they prolificate, spreading out to cause more harm.

Bryophytes cannot be controlled easily by scrapping off, as residues will be left that allow them to re-establish.

In lawns many gardeners use sulphate of iron to burn off mosses, which is only a very temporary fix as the acidity of the iron only burns off the top of the moss, allowing it to re-establish again fairly quickly.

There are various products advertised to clean up bryophytes such as ones that are sprayed on, then left for weathering to remove. Many of these are fairly expensive and bryophytes are like ants,

you can never eradicate them as they will always come back .

Bryophytes multiply by spores of which they create vast numbers, carried by water and air they will always return.

Some years back a chemical called benzalkonium chloride, which was used in the medical industry for sterilizing instruments, was discovered to be a boon in the control of bryophytes without harming other plants.

Benzalkonium chloride is an interesting chemical been an aqueous solution and used as a detergent, fungicide, bactericide, and spermicide.

The first product to use benzalkonium for the control of mosses etc was branded, Surrender and the writer picked up on this many years ago and introduced its use to gardeners in Palmerston North though the garden centre I was operating at that time.

It became very popular but was then only available in the commercial pack of one litre.

The product is formulated at 500g / litre benzalkonium chloride in the form of a soluble concentrate and used at the rates of 25 to 50 mls per litres of water.

Many mosses and liverworts need the 50 mls per litre dosage to have effective control where some other bryophytes such as lichen and algae can be controlled successfully at 25 mls per litre.

A product is available from some garden centres or by mail order using the same formulation and called Wallys Moss and Liverwort Control.

Available in both 500 ml and one litre containers making it more affordable in comparison to the previous brands.

When using on moss and liverwort it is very important that you adjust the sprayer’s nozzle so it is a bit of a jet not a spray mist as the product has to be driven into the target plant.

In recent times I have had the thought that as the chemical is used as a fungicide in some commercial preparations then there is an off label use for in for gardeners in helping to control some fungal diseases.

One that comes to mind is the devastating rust that decimated many gardeners garlic crops over the last two seasons.

A spray over the foliage at the very first sign of rust at say 25mls per litre to start with and then upping to 50mils if the lessor rate does not appear to be doing the job adequately.

As we know that the product does not affect plants when sprayed over them while treating lichen and liverworts so I dont see that it would damage the leaves of garlic either. Besides the leaves are being severely damaged by the rust colonies.

In regards to Garlic Rust last season I used Wallys Cell Strengthening products with great success.

The soil drench was applied after the bulbs sprouted and again two weeks later.

When the foliage was showing I did a weekly spray of the Cell silicon Strengthening spray that had the Super Spreader added. I also added some MBL (Magic Botanical Liquid) and molasses to the spray for good measure.

No sign of any rust and a good crop of garlic.

In the meantime with the wet weather times arriving ensure your walkways are kept clear of slippery moss and algae.

I have mentioned several times in past articles about a world wide famine add to that hyper inflation and a energy crisis we have a perfect storm.

My advise is keep the vegetable gardens going and stock up on non perishable food items while you can as they are disappearing from the shelves and replacements are much more expensive.

Happy Gardening and if you email me there are a few bits of other things.

Problems ring me at 0800 466464
Email wallyjr@gardenews.co.nz
Web site www.0800466464.co.nz
Phone 0800 466464
Garden Pages and News at www.gardenews.co.nz
Shar Pei pages at  www.sharpei.co.nz
Mail Order products at www.0800466464.co.nz

Photo: Engel62 @ pixabay.com

Building a Stackable DIY Worm Farm for $30

Epic Gardening 1.66M subscribers

In my last video on vermicomposting, I went through a simple setup of a single-tote worm bin from Uncle Jim’s Worm Farm. Pretty soon, that bin was full and it was time to redesign the system to be more scalable and easier to work with. A 3-tote stackable system has a few advantages: – Bottom tote can be used for drainage of worm juice – Middle and top bins can be swapped out infinitely – Worms will self-separate from castings, making harvesting castings easy – Can hold way more food scraps and worms Overall, a stackable system is simply better than a single-tote system. This video goes through exactly how to build one, with a few modifications that I made note of in the video. There are probably more ways to improve upon this design as well, so let me know in the comments. So far, it’s working wonderfully though! Making a DIY worm bin adds a ton of extra fertility to your garden and is a great way to make use of food scraps 🙂

VIDEO LINK

Photo: screenshot thanks to Epic Gardening

6 Different Ways To Compost, No Matter Where You Live

VIDEO LINK

Epic Gardening 1.66M subscribers

Composting is ESSENTIAL for gardeners, no matter how big or small you’re growing. In today’s video we’ll look at 6 different ways you can compost and their pros and cons. I’ve done every single method and have filmed many in-depth videos on these, so dive deep and up your composting game to EPIC levels.

1. Hot Composting

2. Cold Composting (Passive Composting)

3. Compost Tumblers

4. Worm Composting

5. Bokashi Composting

6. Direct Burying

WATCH AT THE LINK ABOVE

Photo: thanks to jokevanderleij8 @ pixabay.com

5 Container Gardening Options for Apartment Gardeners

Epic Gardening 1.66M subscribers Apartment gardening and balcony gardening is challenging – you’re often limited on space and sun. You may think you “can’t grow much” in your small space garden, but with a few creative container gardening ideas you can still squeeze an impressive amount out of small spaces.

WATCH AND LISTEN AT THE LINK ABOVE

Clean up time in the garden (Wally Richards)

Time flies that’s for sure we are now only about 2 months away from the shortest day and after that has passed we are into a new season of gardening.

Now during this quieter time we can do some tidy ups in preparation for the new season ahead.

Starting for those that have glasshouses or tunnel houses if your summer plants are about finished and ready to remove then it is time to fumigate the house and kill off all the pests that maybe on the old plants and in the nooks and crannies.

The cheapest way to do this is to burn yellow sulphur powder inside the house.

Leave any plants still in the house that are finished as why take them out with likely pests to later infect your outdoor gardens?

The sulphur fumes will likely damage most plants in the house so any that you want to save you should remove their containers or dig them out of the soil and put them in pots.

Move these preferred potted plants to a protected place such as under a carport or on a veranda where they have some protection against the winter chills.

You could spray them with Vaporgard before or after moving them to reduce their shock of being out in the real world.

Close down all your vents leaving the door open for your escape route.

Place about three tablespoons of sulphur powder onto a steel plant such as a spade or hearth shovel.

To light it you need a very strong flame such as one used for burning weeds.

If you do not have then wet a little of the powder with some mentholated spirits and light that.

Once the Sulphur powder starts burning it is hard to put out and all should burn creating sulphur fumes which choke and kill the pests that are inside the house.

Once it starts to burn quickly exit the house and close the door.

Leave the house sealed for a day or two before entering the house which should be safe with only a lingering smell of sulphur.

As it is winter there is no need to open vents or leave the door open to let any pests from outside enter the house.

If you grow in soil or in raised beds in the house you may like to wipe out any possible soil diseases from last growing season.

Some gardeners like to change the soil in the house each winter with the idea that it will remove any soil born diseases.

Outside of a lot of work to do so the only likely advantage is the psychological aspect you gain.

Soil born diseases are very difficult to remove as only a small amount left behind can re-infect the new soil brought in.

Also the new soil brought in may also have diseases in it and so then a waste of time.

In the past injecting steam into the soil was used by commercial growers later to be replaced by chemical sterilization.

For the home gardener this was to use a now banned product called Basamid.

Basamid killed soil diseases, pests and weed seeds and from what I saw in the spring seemed to give the soil a new lease of life as plants seem to take off.

Jeyes Fluid was also another popular disinfectant used to kill bacteria in the soil.

The product is not easily available in NZ anymore but maybe available by mail order.

The problem with Jeyes fluid is that it not only kills the pathogens in the soil but also harms the beneficial microbes which you want for a good healthy soil.

A new natural product is available called Wallys Terracin.

Terracin contains a bacteria that produces antimicrobial compounds which, when introduced to the soil,

resets the existing soil biology.

It contains powerful beneficial microbes that beat up on the pathogens.

As it contains microbes you should only dilute it to the instructions using non chlorinated water as you do not want to kill what you paid for.

Used as a soil drench on lightly moist soil to give the soil a nice soaking as to the instructions on the label.

Two weeks after applying Terracin I suggest that you mix Bio Marinus™ ( manufactured by the enzymatic hydrolysis of fish offal, blended with humate, seaweed and biology including Bacillus subtilis, Trichoderma and other beneficial microbes) with Wallys

Mycorrcin in a watering can using non chlorinated water to dilute.

Once mixed apply to the moist soil immediately as the food content in the Mycorrcin will start the microbes breeding and it would, if left in the watering can, overflow the liquid.

Also if you were to put the two products together into a plastic bottle and seal the bottle will expand like a balloon before it explodes.

Powerful microbes for sure.

Also you may like to apply the same treatments to your vegetable garden or other preferred gardens to increase the microbial soil activity making for significantly healthier plants this coming season.

Remember that once used you do not want to destroy what you have created later on by watering the areas with chlorinated tap water.

See www.0800466464.co.nz for a housing and filter system you can easily connect to an out door tap.

Filtered tap water will make am amazing difference to your gardens and plants.

It means healthier plants with less problems as the soil life is not harmed by chlorine poison.

Also if you do not have a filter in the kitchen for drinking and cooking water then you can easily fill flagons or bottles from the filter outside which is much better for your health and the health of your pets.

With this crazy world currently you want to have the best soil possible so you can feed your family with

highly nutritious foods, home grown.

As always for those that are interested send me an email for other non gardening bits.

Phone 0800 466464
Garden Pages and News at www.gardenews.co.nz
Shar Pei pages at  www.sharpei.co.nz
Mail Order products at www.0800466464.co.nz

What to do with those fallen leaves (Wally Richards)

A reader from Southland emailed me this week and asked if I could write an article about what to do with autumn leaves.

For some home owners, autumn leaf fall is a curse, just another chore to rake them up and clear the gutters.

For gardeners, leaf fall is a blessing and they gladly collect the leaves to make leaf mould.Leaf mould is excellent for improving soil, also as a lawn conditioner and mulch over gardens.

It can be used in seed raising mixes and potting mixes.Leaf mould is easy to make, its free with a little effort on your part and its a good substitute for peat moss in your gardens.

If you live in an area where there are hedgehogs and you would like to help them through the winter then leave any leaf fall thats under hedges and other out of the way areas.

The hedgehogs may use the places as hibernating sites over winter.

Also if you have bare vegetable or flower gardens either leave the leaves as a cover over the area or place a good layer over the gardens yourself.

Sprinkle garden Lime over the leaves then spray them with Thatch Busta which will help break down the mat of leaves, getting the gardens ready for spring.

This cover of the leaves will prevent a lot of weeds from growing in the bare gardens.

Now to make your own leaf mould with what is left or what you can collect from else where.

There are two ways to do this and one is much faster than the other.

The fast way is to lay some leaves over a flat area of lawn an inch or two thick and the with your rotary mower adjusted to the lowest setting run over the leaves with your catcher on.

Repeat this with another layer of leaves and so on.

When your catcher is ready to empty, open a black plastic rubbish bag and put a few handfuls of leaves and any grass clippings into the bottom of the bag.

Sprinkle over the leaves a handful of garden lime and then spray with Thatch Busta at 10 ml per litre. (If you don’t have Thatch Busta but have Mycorrcin, then use it at 15mls per litre.)

Now add a few more handfuls of mashed up leaves and repeat the lime and spraying.

Press down when bag is full to compress the material and then you can add a lot more.

Finally when the bag is full enough to still be able to tie off, tie the top then with a small nail or thin blade screw driver punch lots of small holes all over the bag.

Toss the bag into a sunny out of the way area and leave for a month or so.

After a few weeks pick up the bag, give it a shake and put it back with a different side facing upwards.

Repeat this about every month or so.The bag will appear to have more space in it as the material coverts to leaf mould.

Within about 6 months you should have a lovely crumbly product that smells good.

The sprinkling of lime is important as the leaves that fall are acidic and you want them sweet so the bacteria will work breaking them down to mould.

The Thatch Busta or Mycorrcin is also very important as they supply the food that increases the microbe populations which speeds up the process.

The alternative method is to place the leaves into a rubbish bag without using a rotary mower to break them up.

Otherwise the lime and spray are used between layers and tied off as above.

This way will take at least twice as long to get your leaves into good leaf mould (say about a year)

Without the lime and Thatch Busta/Mycorrcin then about two years.

If you are not able to clear the leaves and are going to leave them where they fall, then the best thing to do after they have finish falling is to sprinkle some garden lime over them

and spray with Thatch Busta.

Repeat the Thatch Busta spray every month or so to speed up break down.

If you haven’t planted your spring bulbs yet then you should get cracking now.

If you are planting a bed of bulbs then sprinkle the area with Wallys Unlocking the Soil, blood & bone and Wallys BioPhos.

Rake the  products into the bed then plant your bulbs.Remember to place the tallest growing spring flowers at the back or if a bed in the open place tall growing ones in the centre.

The shortest growing will be in the front.Rather than having a bare bed for a while till the spring bulbs emerge, plant some alyssum and lobelia seedlings.

They will make a nice ground cover over the winter and a lovely back drop for your flowering bulbs.Don’t forget to protect tender plants from frost.

Spray with Vaporgard and if there happens to be two or more frosts in a row, night after night then cover plants with frost cloth or sack/newspaper)

Winter time plants hate wet feet but they may still need an occasional drink during periods of no rain.

Container plants not in the open will occasionally need a drink also; best to wait till they start to droop from lack of moisture then give them a small drink.

Plants like citrus trees in open ground that detest wet feet should be sprayed with Wallys Perfection to prevent root rots in winter.

Remove all mulches as they prevent drying of wet soil which causes root rots and diseases during winter.

Leaving mulches on the soil often leads to loses of plants that cant handle wet feet.

If you are one that likes a bit of news on other matters then email me.

Problems ring me at
Phone 0800 466464
Garden Pages and News at www.gardenews.co.nz
Shar Pei pages at  www.sharpei.co.nz
Mail Order products at www.0800466464.co.nz

Photo: ichimi @ pixabay.com

How to Grow Ginger in Containers And Get a Huge Harvest

(VIDEO BELOW IN THE ARTICLE)

epicgardening.com
Ginger is a powerful, anti-inflammatory herb that has been used in the culinary world since centuries. The ginger plant forms from a rhizome that grows into a dainty, little flowering perennial. If you want to add flavor and beauty to your food garden, growing ginger is an absolute must. 

Ginger has numerous health benefits and has been used as a medicinal herb since the 16th century. The plant offers quick relief from indigestion, nausea, and can ease common cold and flu symptoms. Truly, ginger is an all-purpose, versatile herb that deserves a place in your garden. 

Read on for our in-depth guide on how to care for and maintain ginger plants!

READ MORE

Ginger Plant: Adding Spice To Your Garden

https://www.youtube.com/watch?v=-mUeNy0rweM

RELATED

GROWING GINGER in a cold climate

Photo: pixabay.com

Grow Potatoes in a Cardboard Box

Going to try this … EWR

Self Sufficient Me 1.59M subscribers

In this video, I show you how to grow potatoes in a cardboard box container as a great gardening hack to recycle, reuse, and be more sustainable.

https://www.youtube.com/watch?v=qUGXSetN5wc

Photo: pixabay.com

IMPORTANT BASIC ELEMENTS: when your plants aren’t growing (Wally Richards)

I receive lots of phone calls and emails from gardeners asking for help with their gardening endeavors.

About 10% of these will be a very familiar problem which is; ‘plants do not grow’.

A few questions often reveals the reasons; such as the over use of man made fertilisers such as general garden fertiliser or even worse, nitrophoska blue.

Often these fertilisers are used to excess (or for too many years) and not only do they damage the soil life but they can also ‘lock up’ in the soil, stunting growth.

The pH of the soil is changed because of the acidic nature of manmade fertilisers.

A little sprinkling of manmade fertilisers, used occasionally to give plants a boost along, is fine as long as the acid aspect is neutralised with a good application of soft garden lime.

Small applications are not going to make fertiliser companies rich compared to handfuls on a regular frequency.

What I am told often by gardeners is; I plant seedlings they slowly grow and seem to sit still for a long time before they either mature or go to seed.

I usually ask the gardener when was the last time you limed (Calcium) the soil.

More often than not it is some time ago or not for a very long time.

A lot of New Zealand soils are a little acidic and become more so over time with our rainfall.

I read one time that calcium is the fuel that feeds the micro life in the soil and without it (soil food web) your plants do not do so well.

Most vegetable plants love a sweet soil which is the term used for an alkaline reading on a pH metre.

The exception to this is potatoes and tomatoes. The vegetables that really love lime are brassicas, peas and beans.

The old gardening way; was to apply garden lime to the garden once a year in the middle of winter.

There are two sources of lime one from lime stone and the other from crushed shells.

Lime stone lime is gritty and slow to breakdown and thus plants may wait some years before they obtain the benefits. Where soft lime breaks down quickly.

Soft lime can be tested by wetting your forefinger and thumb and placing a little of the lime in between.

If it feels soft and makes a slurry then its good value. Lime stone lime is likely to feel course like sand unless it has been powdered down very finely.

After an application of lime the plants start to respond and grow better.

When minerals become locked up because of the over use of fertilisers I also suggest drenches of Magic Botanic Liquid. (MBL)

This excellent product is good for unlocking and along with a dose of calcium, plants respond very quickly and really grow.

Sometimes I have gardeners call me back to say that within a week of doing the above the plants have shown new amazing growth.

There are areas in your garden where you do not want to apply garden lime at all or only a little.

In the annual/perennial flower garden a little occasionally is good.

For acid loving plants use gypsum or dolomite or even better a combination of both.

These contain not only calcium but also Sulphur (gypsum) and magnesium (dolomite)

Which means they can also be used to advantage where you use garden lime on flower beds and vegetable gardens.

Rather than a dose once a year in winter you are far better of to give a sprinkling every 3 months.

The beginning of each season is a good time as it is easier to remember.

So at the beginning of spring and again at the beginning of summer, autumn and winter.

If you have not been in the practice of doing this you will likely notice an improvement in your gardens because you are nurturing the essential soil life.

(Do not use chlorinated water on your gardens either, filter it out with a 5-10 micron carbon bonded filter)

Here is another interesting mineral that can be deficient in gardens and when applied they come to life and take off.

That is phosphate and the product that makes the difference is called Wallys BioPhos which is reactive rock phosphate broken down naturally using microbes rather than acid.

This is how rock phosphate is converted to superphoshate: Acid is applied to reactive rock phosphate.

Superphoshate damages the soil life and causes inert soil through continued use and likely is the reason why many gardeners will not use it.

Conventional agriculture and farming using super and nitrates killing off the soil life in their paddocks.

This means the first essential part of the food chain is destroyed, effecting the healthiness of plants/grass, animals and ourselves.

This is so simply logical, that you wonder why it is allowed to continue?

Mind you it does not make any money for fertiliser, chemical and pharmaceutical companies so we must respect their bottom lines even if we and our environment are not healthy.

Even worse; in the process of converting rock phosphate to superphoshate a pollutant is produced on the ‘scrubbers’ called, fluoride acid (hydrofluorosilicic acid);

a classified hazardous waste, but it is barreled up and sold, unrefined, to communities across America and the world including New Zealand.

Communities to add hydrofluorosilicic acid to their water supplies as the primary fluoride chemical for water fluoridation.

This has to be one of the biggest scams in recent history, a waste product that would cost millions to clean up and disposed of,

is sold at a profit on the pretense it will substantially help fight tooth decay?

BioPhos not only provides plants with the phosphate they require it also introduces beneficial microbes into your soil. BioPhos does the following for plants;

Increases Photosynthesis and storage of sunlight energy

Formulation of simple sugars

Use of sugars and starches for growth

Transfer of energy during plant chemical reactions

Maintenance and transfer of plant’s genetic code

Development of new plant cells

Germination, size, number and viability of seed

That is why some gardeners really notice a big difference when they apply the natural product to their gardens and plants.

Wally Richards

Phone 0800 466464
Garden Pages and News at www.gardenews.co.nz
Shar Pei pages at  www.sharpei.co.nz
Mail Order products at www.0800466464.co.nz

Growing food in a raised garden (Wally Richards)

I wrote this article 8 years ago and to this day I have found it to be
the best and less expensive way to make and grow in a raised garden.


Extract from the original article:
I wanted a raised garden that could be worked without bending down and the cheapest way for that would be to use roofing iron. Three new sheets of galvanized iron 1.8 metres long and two 100 x 100 fence posts were also purchased the length of which was half the width of the of the sheets of iron. When you cut the fence post in half and no wastage.
The fence posts are treated with chemicals so to overcome that problem
a couple of coats of acrylic paint was applied all over the wood surface after cutting them in half. The posts are not going to be dug into the ground and the whole raised bed will sit in the ground on concrete.

(Now this is very important that you have a concrete pad to sit the
raised garden on. If not robber roots from plants, shrubs and trees will find your garden and fill it nearly to the top of the soil with feeder roots.
After one season the raised garden will be useless and will grow
nothing.)


Construction was simple; lay the two painted fence posts on the ground
and place one sheet of iron over the posts to completely cover the two
posts. Check to make sure its square fitting and then drill holes of suitable diameter to take the roofing screws. On a roof you would fasten the ridge part of the iron sheet so water would flow down the gully part.
For your raised garden the reverse applies. Screw in the roofing
screws at both ends of the sheet. The reason for using screws as apposed to roofing nails is they are easy to unscrew if you want to move the raised garden or extend it. The same is done on the other long length of iron. You now have two sides so next the ends.

The final sheet of iron is cut in half making it 90cm long, a nice
width to work on from one side or both. The posts are going to be
inside the bed. The two ends are screwed to the fence posts. It is best to assemble where its going to sit which ideally one long side should be facing in a northerly direction..
One very important aspect about where you are going to place the
garden and that is as far away from trees, shrubs or other plants as
possible. (Unless its is on a concrete pad).
If anywhere near say a tree or too close to a drip line, the tree will
send out feeder roots to your raised garden and then upwards to take
all the goodness out. The garden becomes a dense mesh of feeder roots over a couple of seasons and nothing will grow in it. I found this out the hard way as my first raised garden was about a metre away from a fence that had a cocktail kiwi fruit growing on it. Within two seasons it had become a mass of fibrous roots and resulting in a very big vine on the fence. If your raised garden is sitting on concrete no problems.

Now you have the raised garden ready to fill.
Any trimmings of trees and shrubs goes in onto the pad along with any
organic material which can be grass clippings (not sprayed with herbicide for over 18 months) sawdust, newspaper, old spent compost, old potting mixes and even some top soil (which is likely to have weed seeds in it)
filling the raised garden to about half the depth. You can even trample it down and add more to about half full. Over this you put several layers of newspaper. Cover this with purchased compost that is NOT made from green waste.

Daltons & Oderings Composts are two safe ones along with straight
mushroom compost.

The fill will take it to about 35cm from the top of the raised garden. Now you spread some goodies such as Blood & Bone, sheep manure pellets, Neem Tree Granules, Wallys Unlocking your soil, Ocean Solids, chicken manure and cover these with another layer of purchased compost about 5cm deep. This should then be about 20 to 30 cm from the top of the raised garden and ready for you to sow seeds or plant seedlings. After planting you can stretch some netting or crop cover across the bed and hold secure with a nail in each corner post. This will stop birds and cats from getting in and destroying your plantings and if crop cover is used it will stop most insect pests as well including butterflies. Having one long side facing north will heat up the contents through the iron; warming nicely the mix.

The gap between the mix and the top creates a wind break and so you
have your own special micro-climate and plants will grow twice as fast
compared to if they were in open ground. When a crop is harvested just place more goodies into the bed and cover with more compost. You will get years of pleasure and nutrition dense vegetables for your health.
You can easily extend the raised garden with two more 1.8 sheets and
one more post cut in half. Unscrew one end that you want to extend, removing the end section. Unscrew the sides at that end so your new sheets will overlap onto the existing and be screwed on together.
Posts at other end will take the end half sheet and now you have 3.6
metres of raised garden. Fill this as previously. You may need to place a brace across the middle to posts to prevent it bowing outwards.

Happy Raised Gardening.

Mentioned previously in several articles about a pending food shortage
I see this week that The UN has announced a catastrophic world wide
food shortage pending.
I also see that; “Farmers in England have been given taxpayers’ cash to rewild their land, under plans for large-scale nature recovery projects announced by the government. These will lead to vast tracts of land being newly managed to conserve species, provide habitats for wildlife and restore health to rivers
and streams.6/01/2022 The ambition at Rewilding Britain is to see nature recovering across 30% of Britain’s land area by 2030. That’s equivalent to approximately 7 million hectares.”


In NZ we also see Government encouraging tree planting and conservation programs to reduce the land that is farmed. There are moves to apparently introduce Frankenfood: (Perjorative term
for genetically modified food whether it be derived from genetically
engineered plants or animals.)
All sounds like conspiracy stuff but if the arable food growing land
is reduced and major food suppliers like Russia and Ukraine no longer
exporting food stuffs from crops there is a problem. Best you grow as much as you can and also stock up with essentials like flour, rice, pasta and tins of food.
Remember money is only as good as what it can buy and if there is
nothing available to purchase money is useless. Food then becomes very valuable along with fuels.
Also other bits if you email me.
Phone 0800 466464
Garden Pages and News at www.gardenews.co.nz
Shar Pei pages at  www.sharpei.co.nz
Mail Order products at www.0800466464.co.nz

The Nazi doctor, Josef Mengele, known as the Angel of Death, said:
“The more we do to you, the less you seem to believe we are doing
it.”
_NEW ZEALAND BILL OF RIGHTS ACT 1990_. Part II of the Act covers a
broad range of Civil and Political Rights. As part of the right to
life and the security of the person, the Act guarantees everyone:
1The right not to be deprived of life except in accordance with
fundamental justice (Section 8)
2The right not to be subjected to torture or to cruel, degrading, or
disproportionately severe treatment or punishment (Section 9)
3The right not to be subjected to medical or scientific
experimentation without consent (Section 10)
4The right to refuse to undergo any medical treatment (Section 11)
Furthermore, the _New Zealand Bill of Rights Act 1990_ guarantees
everyone: Freedom of Thought, Conscience, and Religion.
This includes the right to freedom of thought, conscience, religion,
and belief,
INCLUDING THE RIGHT TO ADOPT AND HOLD OPINIONS WITHOUT INTERFERENCE
(Section 1)


Regards Wally Richards

How to Grow Celery: Tips, Tricks

From foodrevolution.org

Before it was a culinary staple, celery was used almost exclusively for medicinal purposes from 850 BC through the 17th century. A 2017 phytopharmacological review (study of medicine from plant sources) on celery confirms “…the Apium has emerged as a good source of medicine in treating various diseases.” From weight gain and skin conditions to rheumatic tendencies and chronic pulmonary catarrh (or “fibroid lung”), celery has proven to be a powerful plant for health. If you want to learn more about the health benefits of celery, click here.

Aside from all its health benefits, celery is a relatively easy plant to grow in many different climates. And it makes a great addition to a food garden, requiring very little space. If you’re interested in trying to grow celery, read on to discover the best reasons to grow it and the top tips for a successful growing season.

https://foodrevolution.org/blog/how-to-grow-celery/

Photo: pixabay.com

APPLE CIDER VINEGAR FOR FUNGAL DISEASES IN THE GARDEN (WALLY RICHARDS)

A reader and keen gardener sent me an email recently about using apple cider vinegar in your garden to prevent and control fungus diseases.

Someone shared it with him and so now I will share it will all my readers.

“Hi Everyone.

I use Apple Cider Vinegar to keep fungal diseases away, including brown rot, curly leaf, black spot, powdery mildew, bladder plum, sooty mould, scab, allium rust (for garlic, onions, shallots), etc..

For fruit trees, vines, and plants..Vegetables and herbs, including garlic..Also for roses and other ornamentals

I’ve been doing this since 2009 for my stone and pip fruit trees, berry and grape vines, citrus, garlic, shallot and vegetable plants throughout my large Garden.. and including for roses..

Vinegar kills mould – which fungal species are.

It also prevents mould growing back in places that are prone to having fungal problems, so helps avoid ongoing fungal problems.

I use 250mil Apple Cider Vinegar (ACV) mixed with 5 litres water in a 5 litre sprayer I keep just for ACV..

I spray the mix when fruit tree buds are only just beginning to show in Spring as small bumps.

I don’t spray when blossoms are showing, leaving them to bees, bumblebees and other little critters for pollination..

Once blossoms have finished, I spray fortnightly on the fruit trees and plants which are prone to fungal problems.. ie, brown rot on stone fruit, sooty mould on citrus,

black spot on roses, rust on aliums, etc.

I stop once all the fruit on each tree are harvested, ie: Billington Plums finish in early January here in the Eastern Bay of Plenty, so I stop then..

Boysenberries finish late January here, stopping then.. Niagara Grapes, finish mid February here, stopping then..

Omega Plums finish late February here, stopping then.

Spray the mix in the evening when the sun has just gone off your trees or plants, so the sun isn’t heating/burning leaves through the liquid spray droplets on them, and there’s time for the spray to dry before nightfall..

Spray the whole tree, vine or plant.. under and over leaves, the trunk, branches, twigs, fruit everything..

This will also feed the tree through the leaves (when they are there for deciduous trees) as a foliage food.

I do this for all my fruit trees, vines and plants.. stone and pip fruit, citrus, grapes, berries, including strawberries, plus for garlic, shallots, onions, courgettes, cucumbers, pumpkins, tomatoes, roses, etc..

No need for gloves or coverings as it’s good for us too..

I keep a 5 litre sprayer filled with the ACV and water mix, so I can pick it up, pump it to build pressure, and I’m ready to spray this mixture that is good for my Garden..

(Thats a good tip as you can leave in the sprayer what is not used for next time and if you are going to follow this advise, using apple cider vinegar a separate sprayer for this purpose is a good investment)

The ACV mix works as a foliage food through the leaves.. with that feeding them, plus fungal problems not being an issue, the trees, vines and plants grow strongly..

a healthy, strong tree or plant will repel disease.. maybe repel insects like whitefly and vine hoppers, etc, etc, too..

It’s interesting.. I’m continuing to observe.. This is why I use ACV throughout my Garden, and have continued since trialing with it in 2009..

Decided to try ACV due to the goodness of the apples that it’s made with, had excellent results and have continued since for brown rot,

black spot, curly leaf, allium rust, sooty mould, powdery mildew, etc… all the fungal problems that occur often in our NZ gardens..

When my trees were producing well, I contacted the head tutor of the horticulture course at the local polytech, asking if I could swap a box of freshly picked Golden Queen Peaches in exchange for him showing me how to Summer prune. He also has a 6 acre home orchard.

I showed him around my garden.. he kept saying, how have you got your trees so healthy.

I told him about using the ACV mix and why.

As he left, he picked a Golden Queen Peach out of the box, bit into it, said, now that’s how a Golden Queen should taste and I’m off home to start using Apple Cider Vinegar throughout my garden.

Also – ACV for cats: I add 1/4 teaspoon of ACV to our cats food each morning – have done this since March 2019 – no fleas, and they have shiny soft fur..

None of the awful monthly flea treatment that distressed them every time and sent them running from the house to try to get away from it. ” END

Sometimes it is the simple things that we forget about or more likely do not know about and can be very surprised when found to work.

I have now added a 2 litre Apple Cider Vinegar to our mail order web site in the Disease control section so that when you are ordering your other garden bits you can add in this well priced product.

(No point in paying for the expensive stuff as this will do the job.)

Happy Gardening…..

Not wanting to be a Doom sayer but warnings and preparations can save a lot of grief in time to come.

A link that maybe of interest.. https://usawatchdog.com/going-to-get-bad-really-bad-david-morgan/

Phone 0800 466464
Garden Pages and News at www.gardenews.co.nz
Shar Pei pages at  www.sharpei.co.nz
Mail Order products at www.0800466464.co.nz